Craving a warm, cheesy bite that’s quick to make and easy to love? These Homemade Ham and Cheese Hot Pockets are everything you want in a comforting snack—crispy on the outside, melty on the inside, and totally freezer-friendly. Whether you’re packing a school lunch, prepping for busy weekdays, or just need a satisfying treat, this recipe has you covered.
Made with simple ingredients like deli ham, gooey cheese, and buttery puff pastry (or your favorite dough), these pockets are endlessly customizable and surprisingly fun to put together. If you’ve ever reached for the store-bought version, wait until you try this homemade twist—it’s fresher, more flavorful, and surprisingly easy.
Let’s dive into how to make your new go-to make-ahead meal that both kids and adults will be reaching for.
Key Benefits of Homemade Ham and Cheese Hot Pockets
If you’ve ever wished for a quick, cheesy, and satisfying meal that doesn’t come out of a freezer box, you’re going to love this recipe. These homemade ham and cheese hot pockets aren’t just tasty—they’re also practical, versatile, and perfect for every kind of eater, from picky kids to busy adults. Here’s why they’re about to become a staple in your kitchen:
Table of Contents
Simple, Everyday Ingredients
No fancy groceries here—just classic staples like puff pastry (or pizza dough), deli ham, and shredded cheese. You likely have most of them in your fridge already.
Quick and Easy to Make
Whether you’re cooking for the week or whipping something up last-minute, these hot pockets come together in about 30 minutes. Just roll, fill, fold, and bake!
Freezer-Friendly for Busy Days
Make a double batch and freeze them for grab-and-go lunches, after-school snacks, or stress-free dinners. They reheat beautifully in the oven or air fryer.
Family-Friendly and Customizable
Let everyone join in! Add your own twist with different fillings—think turkey and Swiss, or even veggies for a meatless version. Great for picky eaters or adventurous ones.
Perfect for On-the-Go Meals
Lunchbox hero? Check. Road trip snack? You bet. These pockets are portable and mess-free, making them ideal for busy lifestyles.
With all these benefits wrapped up in golden, flaky pastry, there’s no reason not to give them a try. You’ll wonder why you ever bought the store version in the first place!
Ingredients for Homemade Ham and Cheese Hot Pockets
Ready to create a warm, melty pocket of comfort? You won’t need anything fancy—just a few simple ingredients that come together for big flavor. This recipe is all about balance: buttery pastry, savory ham, and gooey cheese in every bite.
Here’s what you’ll need:
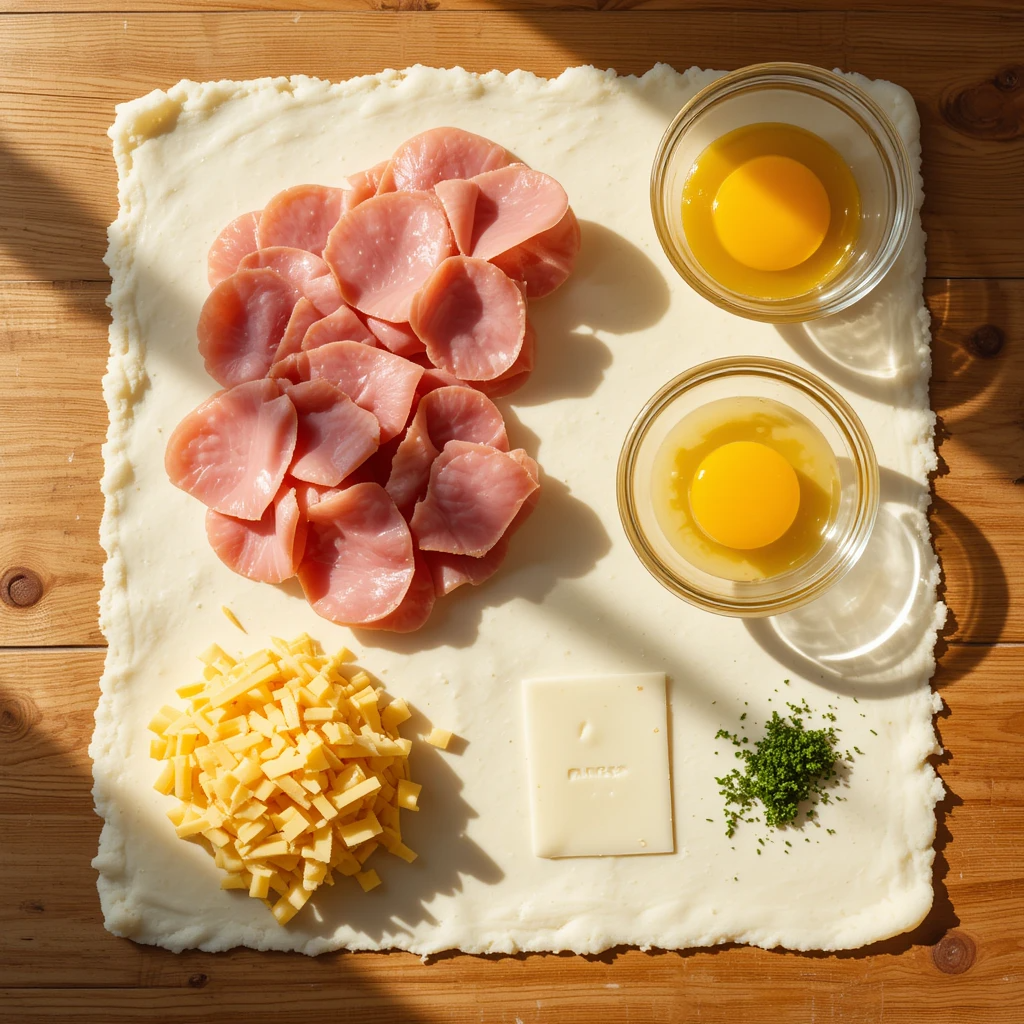
Basic Ingredients:
- 1 sheet of puff pastry (thawed), or use pizza dough or crescent roll dough for a different texture
- 6–8 slices of deli ham, chopped or torn into bite-sized pieces
- 1 cup shredded cheese (cheddar, mozzarella, or Swiss all work well)
- 1 egg, beaten (for egg wash)
- 1 tablespoon water (to mix with the egg wash)
Optional Add-Ins & Swaps:
- A pinch of Dijon mustard or mayonnaise for a flavor kick
- Fresh herbs like parsley or thyme for extra aroma
- Sautéed spinach or bell peppers for a veggie boost
- Different meats: try turkey, bacon, or leftover roast chicken
- Alternate cheeses: think provolone, pepper jack, or Gruyère
Pantry Staples You Might Already Have:
- Salt and black pepper, to taste
- Cooking spray or parchment paper for easy baking
Pro Tip: Shred your own cheese if you can—it melts better than pre-shredded varieties, which often contain anti-caking agents.
These ingredients are all about flexibility. Whether you’re using what’s in the fridge or tailoring each pocket to suit different taste buds, there’s no wrong combo here. Let’s keep things fun and fuss-free!
How to Make Ham and Cheese Hot Pockets
Making your own ham and cheese hot pockets at home is easier than you think—and way more satisfying than anything boxed. With just a few steps, you’ll have warm, golden pockets ready to enjoy fresh or freeze for later. Let’s walk through it together!
What You’ll Need:
- Rolling pin
- Sharp knife or pizza cutter
- Baking sheet
- Parchment paper
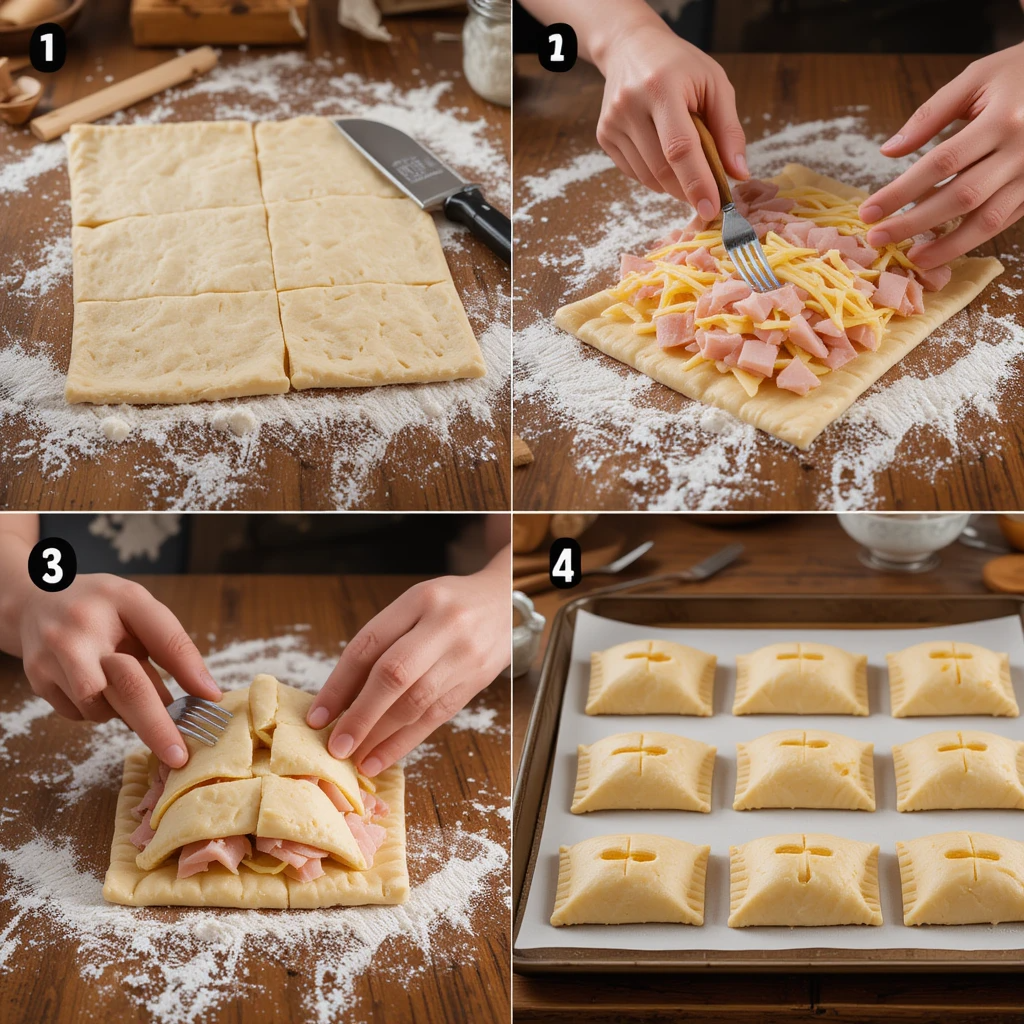
Step-by-Step Instructions:
1. Preheat and Prep
- Set your oven to 400°F (200°C).
- Line a baking sheet with parchment paper for easy cleanup.
2. Roll Out the Dough
- Lightly flour your work surface and gently roll out the puff pastry until it’s about ⅛ inch thick.
- Cut the dough into even rectangles—aim for 4–6, depending on your preferred size.
💡 Tip: Use a ruler or pizza cutter for clean edges and even portions.
3. Layer the Filling
- Place a few pieces of deli ham in the center of each rectangle.
- Sprinkle shredded cheese generously over the ham.
- Add a dab of mustard or a sprinkle of herbs if you want to level up the flavor.
4. Seal the Pockets
- Fold the dough over the filling to form a pocket (like a hand pie).
- Press the edges together with a fork to seal.
- Use a knife to cut a small slit on top of each pocket for steam to escape.
5. Brush and Bake
- Whisk together 1 egg and 1 tablespoon of water for an egg wash.
- Brush the tops of each pocket to get that beautiful golden finish.
- Bake for 18–22 minutes, or until the pockets are puffed and golden brown.
Optional: Air Fryer Method
Want a crispier crust? Pop your pockets in the air fryer at 375°F for about 10–12 minutes, flipping halfway through.
Make-Ahead Tip: You can assemble these ahead of time and refrigerate them for up to 24 hours before baking—or freeze them for up to 2 months. Just bake from frozen, adding an extra 5–7 minutes.
And just like that, you’ve got warm, cheesy, homemade pockets that beat the store-bought version every time!
Pro Tips and Variations
Want to make your homemade ham and cheese hot pockets even better? These tips and twists will help you perfect the texture, enhance the flavor, and keep things fresh every time you make them. Whether you’re looking for a cheesy upgrade or a meatless version, there’s something here for everyone.
Pro Tips for Hot Pocket Success
- Don’t overfill!
It’s tempting to stuff them with extra cheese or ham, but too much filling can lead to leaks. Aim for balance—just enough to fill but still seal easily. - Seal with care.
Use a fork to crimp the edges firmly and prevent filling from spilling out. A tiny slit on top allows steam to escape and avoids soggy dough. - Go for the golden finish.
An egg wash (1 beaten egg + 1 tbsp water) gives that glossy, bakery-style crust. Don’t skip it! - Let them rest.
After baking, let the pockets sit for 5 minutes. The cheese sets a bit, and you avoid burning your mouth with molten filling.
Tasty Variations to Try
Why not have a little fun and switch things up? Here are a few flavor ideas that still use the same easy technique:
- Breakfast Pockets:
Swap the ham for cooked bacon or sausage, and add scrambled eggs and cheddar for a breakfast-on-the-go. - Spicy Kick:
Add sliced jalapeños or a spoonful of spicy mustard to the filling for a zesty twist. - Veggie Lovers:
Skip the meat and load up on sautéed mushrooms, spinach, or bell peppers with melty mozzarella. - Pizza Style:
Sub the ham for pepperoni, use mozzarella and a spoonful of marinara—hello, pizza pocket! - Different Cheeses:
Try Swiss, pepper jack, or provolone for a whole new flavor profile.
Make it your own: These pockets are a blank canvas. Have leftover chicken? Go for it. Want to sneak in some greens? Mix in chopped spinach or arugula.
Experiment, enjoy, and don’t be afraid to get creative. Once you master the basics, the possibilities are endless!
Serving Suggestions
Once your homemade ham and cheese hot pockets are hot out of the oven, the real fun begins—how will you serve them? These golden, flaky pockets are incredibly versatile and pair well with a variety of sides, sauces, and occasions. Whether you’re plating them up for lunch, packing them for school, or setting out snacks for a casual get-together, here are some delicious ways to enjoy them.
Perfect Pairings
Balance out the richness of the cheese and ham with something fresh or tangy:
- Crisp green salad with a light vinaigrette
- Roasted veggies like broccoli, carrots, or zucchini
- Fresh fruit (think apple slices, grapes, or a berry medley)
- Pickles or olives for a tangy bite
Dips and Sauces
Elevate the experience with dipping sauces—especially fun for kids or guests!
- Honey mustard or Dijon for a sweet-spicy kick
- Marinara sauce for a pizza-pocket feel
- Ranch dressing (because it goes with almost everything)
- Cheese sauce for the ultimate cheesy indulgence
💡 Pro Tip: Serve the dips warm if you can—it adds an extra layer of comfort!
Meal Ideas and Occasions
These cheesy ham pockets fit almost anywhere in your day:
- Lunchbox favorite – Wrap in foil for a warm midday surprise
- After-school snack – Quick and filling for hungry kids
- Game day appetizer – Cut into smaller pieces for crowd-friendly bites
- Breakfast on-the-go – Pair with fruit and coffee for a quick morning meal
- Brunch board addition – Slice and serve alongside quiche, fruit, and pastries
Warm, hearty, and endlessly adaptable, these ham and cheese hot pockets are the kind of recipe that makes any meal feel just a little more special. Whether you go classic or get creative with sides and dips, one thing’s for sure—they won’t last long!
Conclusion
Making homemade ham and cheese hot pockets is a game-changer for anyone who loves a quick, delicious, and satisfying meal without the hassle of takeout or pre-packaged snacks. With simple ingredients, easy steps, and endless room for creativity, this recipe fits perfectly into busy lifestyles while delivering comfort and flavor every time.
Here’s why this recipe stands out:
- Freshness you can taste: Nothing beats the flaky, buttery crust and melty cheese straight from the oven.
- Customizable for every palate: Swap fillings, cheeses, or add veggies to keep it exciting.
- Make-ahead convenience: Freeze your pockets for ready-to-bake meals whenever hunger strikes.
- Kid- and family-friendly: Everyone loves a warm, handheld treat, perfect for any occasion.
I hope this recipe inspires you to get in the kitchen and create your own batch of homemade hot pockets. They’re perfect for lunches, snacks, or even a casual dinner. Remember, cooking is all about having fun and making food that brings you joy.
So, what are you waiting for? Grab your ingredients, and let’s make some magic happen in your kitchen!

Homemade Ham and Cheese Hot Pockets Made Easy
Ingredients
Method
- Rolling pin
- Sharp knife or pizza cutter
- Baking sheet
- Parchment paper
- Set your oven to 400°F (200°C).
- Line a baking sheet with parchment paper for easy cleanup.
- Lightly flour your work surface and gently roll out the puff pastry until it’s about ⅛ inch thick.
- Cut the dough into even rectangles—aim for 4–6, depending on your preferred size.
- 💡 Tip: Use a ruler or pizza cutter for clean edges and even portions.
- Place a few pieces of deli ham in the center of each rectangle.
- Sprinkle shredded cheese generously over the ham.
- Add a dab of mustard or a sprinkle of herbs if you want to level up the flavor.
- Fold the dough over the filling to form a pocket (like a hand pie).
- Press the edges together with a fork to seal.
- Use a knife to cut a small slit on top of each pocket for steam to escape.
- Whisk together 1 egg and 1 tablespoon of water for an egg wash.
- Brush the tops of each pocket to get that beautiful golden finish.
- Bake for 18–22 minutes, or until the pockets are puffed and golden brown.
- Want a crispier crust? Pop your pockets in the air fryer at 375°F for about 10–12 minutes, flipping halfway through.
Notes
- Calories: 350 kcal
- Total Fat: 18g
- Saturated Fat: 8g
- Cholesterol: 60mg
- Sodium: 750mg
- Carbohydrates: 28g
- Dietary Fiber: 1g
- Sugars: 2g
- Protein: 16g
FAQs About Homemade Ham and Cheese Hot Pockets
Cooking at home can bring up questions, especially with a recipe as fun and customizable as homemade ham and cheese hot pockets. To help you feel confident every step of the way, here are some common questions and friendly answers that cover everything from ingredient swaps to storage tips.
1. Can I use different types of dough for these hot pockets?
Absolutely! Puff pastry gives a flaky, buttery crust, but you can also use pizza dough, crescent roll dough, or even pie crust for different textures. Each offers a unique twist—so feel free to experiment.
2. What’s the best cheese for melting inside hot pockets?
Cheddar, mozzarella, Swiss, and provolone are all excellent choices. For the best melt and flavor, freshly shredded cheese usually works better than pre-shredded varieties, which sometimes contain additives.
3. Can I make these ahead and freeze them?
Yes! Assemble your hot pockets and freeze them on a baking sheet until firm, then transfer to a freezer-safe bag. Bake from frozen, adding about 5–7 extra minutes to the cooking time.
4. How do I prevent the pockets from leaking during baking?
Don’t overfill and make sure to seal the edges well using a fork. Cutting a small slit on top allows steam to escape, which helps avoid bursts and soggy dough.
5. Are these hot pockets kid-friendly?
Definitely! They’re a hit with kids, especially when you customize the fillings to their liking. Plus, the portable size makes them perfect for lunchboxes and snacks.
6. Can I add vegetables to the filling?
Yes, sautéed or roasted veggies like spinach, bell peppers, or mushrooms add great flavor and nutrition. Just be sure to drain any excess moisture before adding to keep the dough from getting soggy.
If you have more questions or want tips for customizing your pockets, just ask! Cooking is all about experimenting and enjoying the process, so have fun making these cozy treats your own.