Who doesn’t love a crispy baked chicken cutlet that’s both delicious and meal-prep friendly? If you’re looking for a high-protein, oven-baked cutlet with a golden brown crust and tender, juicy center, you’re in the right place!
This easy chicken cutlet recipe is perfect for busy weeknights, family dinners, or even make-ahead lunches. With a light yet crispy panko crust and just the right blend of Italian seasoning, it delivers all the crunch without the grease. Plus, it’s a healthier alternative to frying—no oil splatters, just pure oven-baked goodness!
Ready to create a go-to meal that fits any occasion? Let’s get started!
Key Benefits of Baked Chicken Cutlets
Why should this baked chicken cutlet recipe be your new go-to? Here’s why:
Table of Contents
✅ Healthier Alternative to Frying – Get that golden brown crust without the excess oil! Baking locks in flavor while keeping things light and nutritious.
✅ Perfect for Meal Prep – These cutlets store beautifully, making them ideal for quick lunches, easy dinners, or even freezing for later.
✅ Crispy Yet Tender – Thanks to a well-seasoned panko crust, you’ll enjoy the perfect balance of crunch on the outside and juicy tenderness inside.
✅ Versatile & Family-Friendly – Serve them in salads, sandwiches, pasta, or as a stand-alone dish. Even picky eaters will love them!
✅ Simple & Foolproof – With minimal prep and just a few pantry staples, you can have a restaurant-quality dish without any hassle.
Whether you’re meal prepping for the week or making a quick, wholesome dinner, these baked chicken cutlets deliver on flavor, texture, and convenience. Let’s dive into the ingredients!
Ingredients for Baked Chicken Cutlets
Before we get started, let’s gather everything you’ll need. This recipe keeps things simple yet flavorful, using pantry staples to create that perfect crispy, golden-brown crust.
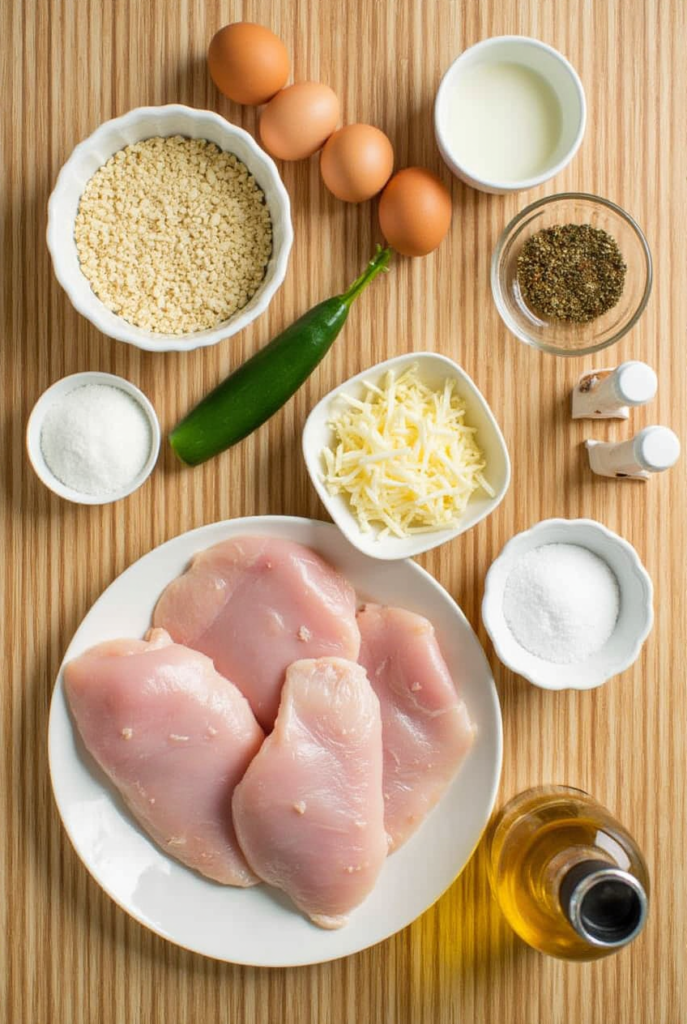
For the Chicken:
- 2 large boneless, skinless chicken breasts (halved lengthwise for even cooking)
- ½ teaspoon salt (adjust to taste)
- ½ teaspoon black pepper
- ½ teaspoon garlic powder (for extra depth of flavor)
- ½ teaspoon Italian seasoning (adds a hint of herbs)
For the Coating:
- 1 cup panko breadcrumbs (for a light, crispy texture)
- ½ cup grated Parmesan cheese (adds savory richness)
- ½ teaspoon paprika (for subtle smokiness and color)
- 1 large egg (helps the coating stick)
- 2 tablespoons milk (makes the egg wash smoother)
- Olive oil spray (for crisping up the cutlets in the oven)
Optional Add-Ons:
- ½ teaspoon red pepper flakes (for a slight kick)
- ½ teaspoon onion powder (for extra flavor)
- ½ cup finely crushed cornflakes (mix with panko for added crunch)
With these simple ingredients, you’ll achieve crispy, tender, and perfectly seasoned baked chicken cutlets—without deep frying! Now, let’s move on to the step-by-step process to bring this dish to life.
How to Make Baked Chicken Cutlets
Now that we have all the ingredients ready, let’s get cooking! Follow these simple steps to achieve crispy, golden-brown baked chicken cutlets with minimal effort.
1. Prep the Chicken
- Preheat your oven to 400°F (200°C). Line a baking sheet with parchment paper and place a wire rack on top. This helps air circulate around the chicken for even crisping.
- Slice the chicken breasts in half lengthwise to create thinner cutlets. Pat them dry with a paper towel—this helps the coating stick better.
- Season both sides with salt, black pepper, garlic powder, and Italian seasoning for a flavorful base.
2. Set Up the Breading Station
- In a shallow bowl, whisk together the egg and milk until smooth. This will act as the glue for the coating.
- In another bowl, mix the panko breadcrumbs, Parmesan cheese, paprika, and any optional seasonings. Stir well to distribute flavors evenly.
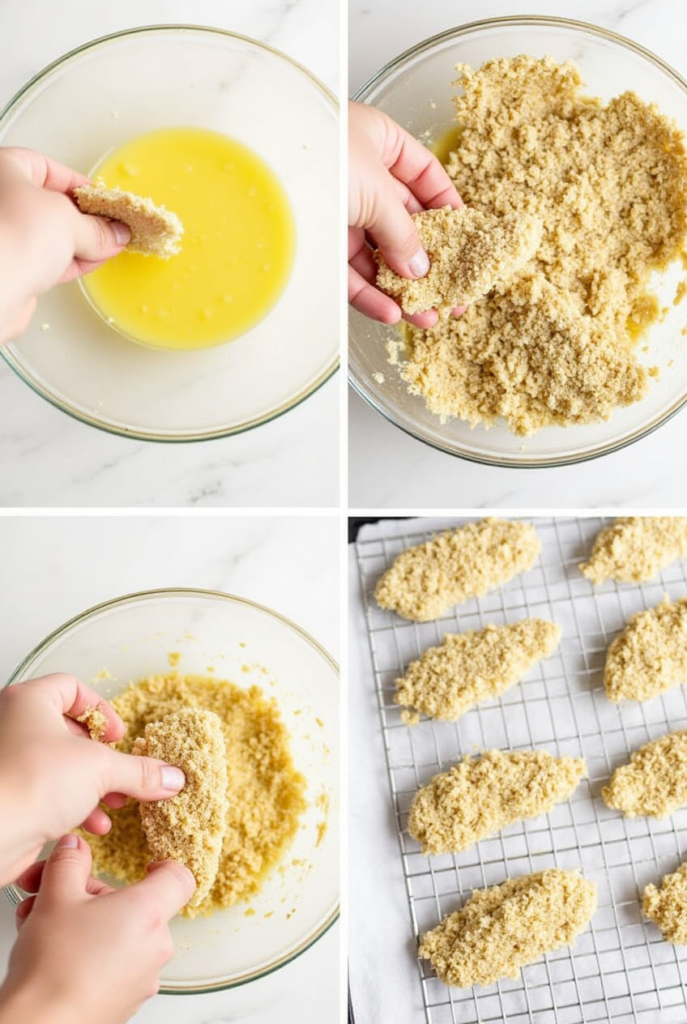
3. Coat the Chicken
- Dip each cutlet into the egg mixture, making sure it’s fully coated.
- Transfer it to the breadcrumb mixture, pressing gently to ensure the coating adheres evenly. For extra crunch, press a second layer of breadcrumbs onto the cutlet.
4. Bake to Crispy Perfection
- Arrange the breaded cutlets on the wire rack. Lightly spray the tops with olive oil spray—this helps them crisp up beautifully.
- Bake for 20-22 minutes, flipping halfway through. The cutlets are done when they reach an internal temperature of 165°F (75°C) and have a deep golden-brown crust.
5. Let Them Rest & Enjoy
- Remove the cutlets from the oven and let them rest for a few minutes—this keeps them juicy inside.
- Serve immediately or let them cool for meal prep. These cutlets reheat beautifully, making them a perfect addition to your weekly meal plan!
Now that your baked chicken cutlets are ready, let’s explore some pro tips and creative variations to take this recipe to the next level.
Pro Tips and Variations
Want to take your baked chicken cutlets to the next level? Here are some expert tips and creative variations to make them even better!
✅ Pro Tips for Perfect Chicken Cutlets
- Pound the Chicken Evenly – If your cutlets are uneven in thickness, use a meat mallet or rolling pin to gently pound them. This ensures they cook evenly and stay juicy.
- Use a Wire Rack – Elevating the cutlets allows hot air to circulate, giving you an evenly crisp crust without soggy bottoms.
- Double Coat for Extra Crunch – For an ultra-crispy texture, dip the cutlets in the egg wash and breadcrumb mixture twice.
- Don’t Skip the Olive Oil Spray – A light mist of oil helps the breadcrumbs turn golden brown, mimicking a fried texture.
- Let the Cutlets Rest – Resting for 2-3 minutes after baking helps the juices redistribute, keeping the chicken tender.
🔥 Flavor Variations to Try
- Spicy Kick – Add ½ teaspoon of cayenne pepper or red pepper flakes to the breadcrumb mixture for a little heat.
- Garlic Parmesan – Mix extra grated Parmesan and minced garlic into the breadcrumbs for a richer, more savory crust.
- Herb-Crusted – Add fresh chopped parsley, rosemary, or thyme to the coating for a fragrant, herbaceous touch.
- Gluten-Free – Swap panko breadcrumbs with gluten-free panko or crushed rice crackers for a crunchy, gluten-free alternative.
- Air Fryer Option – Cook at 375°F (190°C) for 10-12 minutes, flipping halfway, for a crispy, oil-free version.
With these pro tips and variations, you can customize your baked chicken cutlets to match your cravings and dietary needs. Now, let’s explore the best ways to serve them!
Serving Suggestions
These crispy baked chicken cutlets are incredibly versatile and can be served in a variety of ways. Whether you’re enjoying them fresh out of the oven or incorporating them into meal prep, here are some delicious serving ideas to inspire you!
🍽 Classic Pairings
- With a Side of Veggies – Serve with roasted Brussels sprouts, steamed broccoli, or a simple garden salad for a balanced meal.
- Over Pasta – Top with marinara sauce and melted mozzarella for a baked chicken Parmesan-style dish.
- With Mashed Potatoes – Pair with creamy mashed potatoes and a drizzle of gravy for a comforting dinner.
🥪 Sandwich & Wrap Ideas
- Crispy Chicken Sandwich – Place the cutlet on a toasted brioche bun with lettuce, tomato, and a smear of garlic aioli.
- Chicken Caesar Wrap – Slice the cutlets and wrap them in a tortilla with romaine lettuce, Parmesan, and Caesar dressing.
- Buffalo Chicken Style – Toss the baked cutlets in buffalo sauce and serve in a sandwich with ranch or blue cheese dressing.
🥗 Light & Healthy Options
- On a Salad – Slice and add to a mixed greens salad with cherry tomatoes, cucumbers, and a zesty vinaigrette.
- Grain Bowl Topping – Serve over quinoa or brown rice with roasted vegetables and a drizzle of tahini dressing.
- Lettuce Wraps – Swap out bread for crisp romaine or butter lettuce for a low-carb meal option.
🍱 Meal Prep Tips
- Storage: Keep cutlets in an airtight container in the fridge for up to 4 days.
- Reheating: Warm in a 350°F oven or air fryer for a few minutes to restore crispiness.
- Freezing: Freeze cooked cutlets for up to 3 months. Thaw overnight in the fridge before reheating.
No matter how you serve them, these baked chicken cutlets make mealtime easy, delicious, and satisfying. Now, let’s wrap things up!
Conclusion
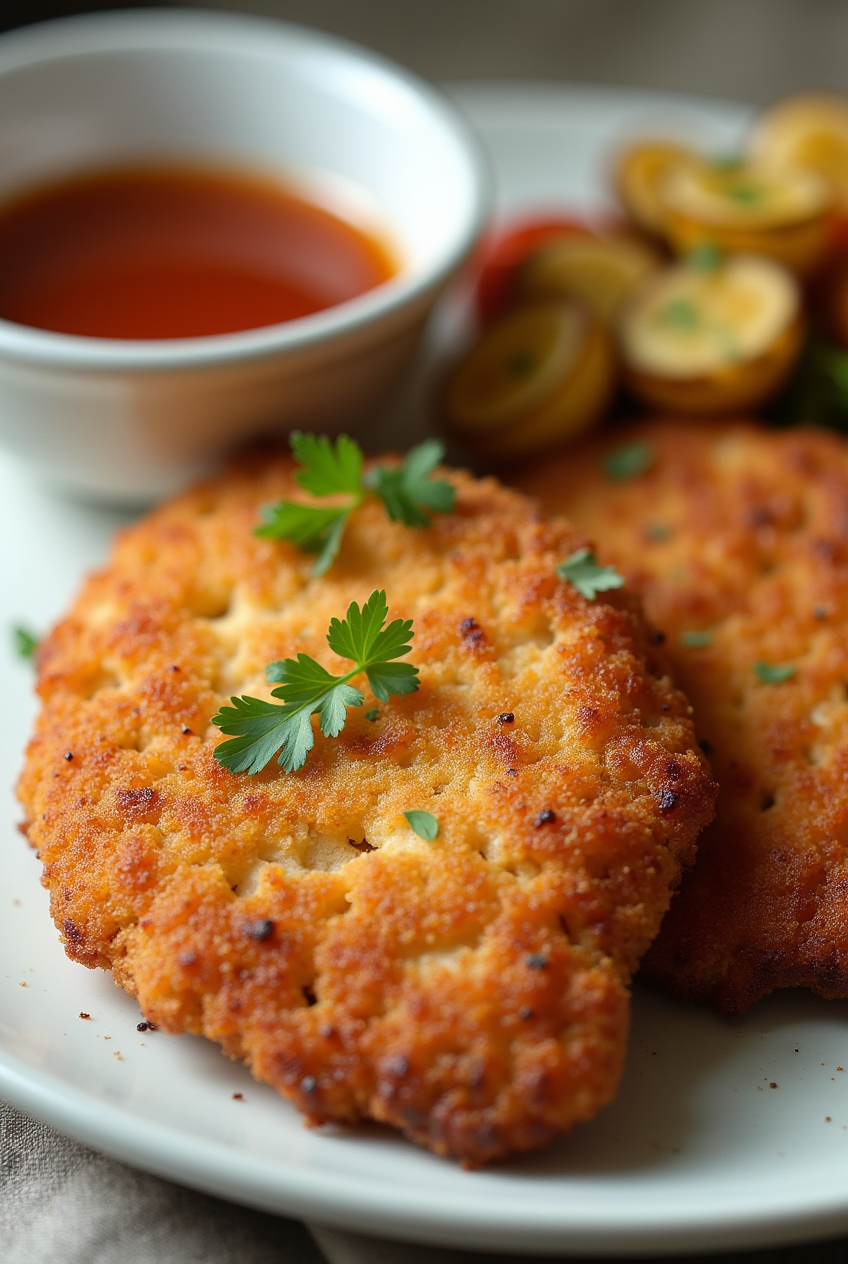
Baked chicken cutlets are the perfect combination of crispy, tender, and flavorful—without the extra oil from frying. Whether you’re making a quick weeknight dinner or prepping meals for the week, this easy recipe delivers restaurant-quality results with minimal effort.
With a golden-brown panko crust and juicy center, these cutlets are incredibly versatile. Serve them over pasta, in sandwiches, on salads, or alongside your favorite sides. Plus, with simple ingredient swaps and variations, you can customize them to suit your taste and dietary needs.
By following the pro tips and meal prep strategies, you’ll have a go-to recipe that makes eating healthy and delicious effortless. Now that you’ve mastered the art of baked chicken cutlets, it’s time to enjoy every crispy, satisfying bite!
Still have questions? Check out the FAQs below for extra guidance.
Baked Chicken Cutlet Victory for Ultimate Meal Prep
Ingredients
Method
- Preheat your oven to 400°F (200°C). Line a baking sheet with parchment paper and place a wire rack on top. This helps air circulate around the chicken for even crisping.
- Slice the chicken breasts in half lengthwise to create thinner cutlets. Pat them dry with a paper towel—this helps the coating stick better.
- Season both sides with salt, black pepper, garlic powder, and Italian seasoning for a flavorful base.
- In a shallow bowl, whisk together the egg and milk until smooth. This will act as the glue for the coating.
- In another bowl, mix the panko breadcrumbs, Parmesan cheese, paprika, and any optional seasonings. Stir well to distribute flavors evenly.
- Dip each cutlet into the egg mixture, making sure it’s fully coated.
- Transfer it to the breadcrumb mixture, pressing gently to ensure the coating adheres evenly. For extra crunch, press a second layer of breadcrumbs onto the cutlet.
- Arrange the breaded cutlets on the wire rack. Lightly spray the tops with olive oil spray—this helps them crisp up beautifully.
- Bake for 20-22 minutes, flipping halfway through. The cutlets are done when they reach an internal temperature of 165°F (75°C) and have a deep golden-brown crust.
- Remove the cutlets from the oven and let them rest for a few minutes—this keeps them juicy inside.
- Serve immediately or let them cool for meal prep. These cutlets reheat beautifully, making them a perfect addition to your weekly meal plan!
Notes
- Calories: 320 kcal
- Protein: 38g
- Carbohydrates: 22g
- Fat: 10g
- Saturated Fat: 3g
- Cholesterol: 120mg
- Sodium: 450mg
- Fiber: 2g
- Sugar: 1g
FAQs
Here are some common questions about baked chicken cutlets to help you get the best results every time!
1. How do I keep baked chicken cutlets crispy?
To maintain crispiness, bake the cutlets on a wire rack instead of directly on the baking sheet. This allows hot air to circulate around them. Also, don’t skip the olive oil spray, as it helps the coating turn golden brown.
2. Can I make these cutlets ahead of time?
Absolutely! You can bread the chicken and refrigerate it for up to 24 hours before baking. If you’ve already baked them, store in an airtight container and reheat in the oven or air fryer to keep them crispy.
3. What’s the best way to reheat baked chicken cutlets?
For the best texture, reheat them in a 350°F oven for 8-10 minutes or in an air fryer at 375°F for 5 minutes. Avoid microwaving, as it can make the coating soggy.
4. Can I freeze baked chicken cutlets?
Yes! Let the cutlets cool completely, then place them in a single layer on a baking sheet to freeze. Once frozen, transfer to a freezer bag for up to 3 months. Reheat directly from frozen in the oven or air fryer.
5. What can I use instead of panko breadcrumbs?
If you don’t have panko, try using crushed cornflakes, regular breadcrumbs, or even almond flour for a gluten-free option. Each alternative will give a slightly different texture but will still be delicious.
6. How do I know when the chicken is fully cooked?
Use a meat thermometer to check for an internal temperature of 165°F (75°C). The cutlets should be golden brown on the outside and no longer pink in the center.
7. Can I use chicken thighs instead of breasts?
Yes! Boneless, skinless chicken thighs work great and will be extra juicy. Just adjust the cooking time slightly, as thighs may take a few minutes longer.
Now that you’re armed with all the tips and tricks, you’re ready to make the ultimate crispy baked chicken cutlets with confidence! Enjoy!