Ever find yourself craving a snack that’s crunchy, savory, and just plain irresistible? This oven-baked Chex Mix recipe is a total crowd-pleaser—perfect for everything from cozy movie nights to lively holiday parties. Whether you’re prepping for game day or just need a homemade snack mix to munch on throughout the week, this recipe delivers bold flavor with every bite.
What makes it even better? It’s easy to make, customizable, and far more satisfying than the store-bought version. You’ll love how the crispy cereal, buttery seasoning, and classic mix-ins come together in the oven for that golden, crunchy finish.
Let’s get into the ultimate party snack everyone will be asking for seconds of.
Key Benefits of Making Chex Mix in the Oven
If you’ve ever grabbed a bag of Chex Mix from the store and thought, “This could be better,”—you’re absolutely right. Making your own oven-baked Chex Mix recipe is a total game-changer. Here’s why it’s worth the (very minimal) effort:
Table of Contents
✅ Better Flavor and Customization
No two homemade batches are ever the same—you control the ingredients. Love extra garlic? Go for it. Prefer it less salty? Easy fix. Want to toss in your favorite crackers or spice it up with cayenne? Totally doable.
✅ Crispy, Even Texture Every Time
The oven method ensures every bite is evenly toasted to perfection. Baking at a low temperature gives you that satisfying, all-around crunch that microwave versions often miss.
✅ Big-Batch Friendly
Planning a party or prepping snacks for the week? This recipe scales beautifully. One sheet pan, one stir every 15 minutes, and you’ve got a crunchy snack mix that feeds a crowd (or fuels your snack drawer all week).
✅ Budget-Friendly and Waste-Free
Why pay premium prices for store-bought when you can make more for less at home? Plus, you get to use up any leftover cereal, pretzels, or nuts sitting in your pantry.
✅ Perfect for Every Occasion
Whether it’s game night, road trips, lunchboxes, or holiday gatherings, this homemade snack mix fits the bill. It’s grab-and-go, make-ahead, and always a hit.
So if you’re ready for a snack that’s flavorful, flexible, and flat-out delicious—this Chex Mix recipe oven-style is your new go-to. Let’s break down what you’ll need next!
Ingredients You’ll Need for This Chex Mix Recipe Oven Style
Before we dive into baking, let’s gather everything you’ll need. This homemade Chex Mix recipe strikes the perfect balance of salty, savory, and crunchy. Best part? You probably already have most of these ingredients in your pantry.
Here’s what goes into the magic:
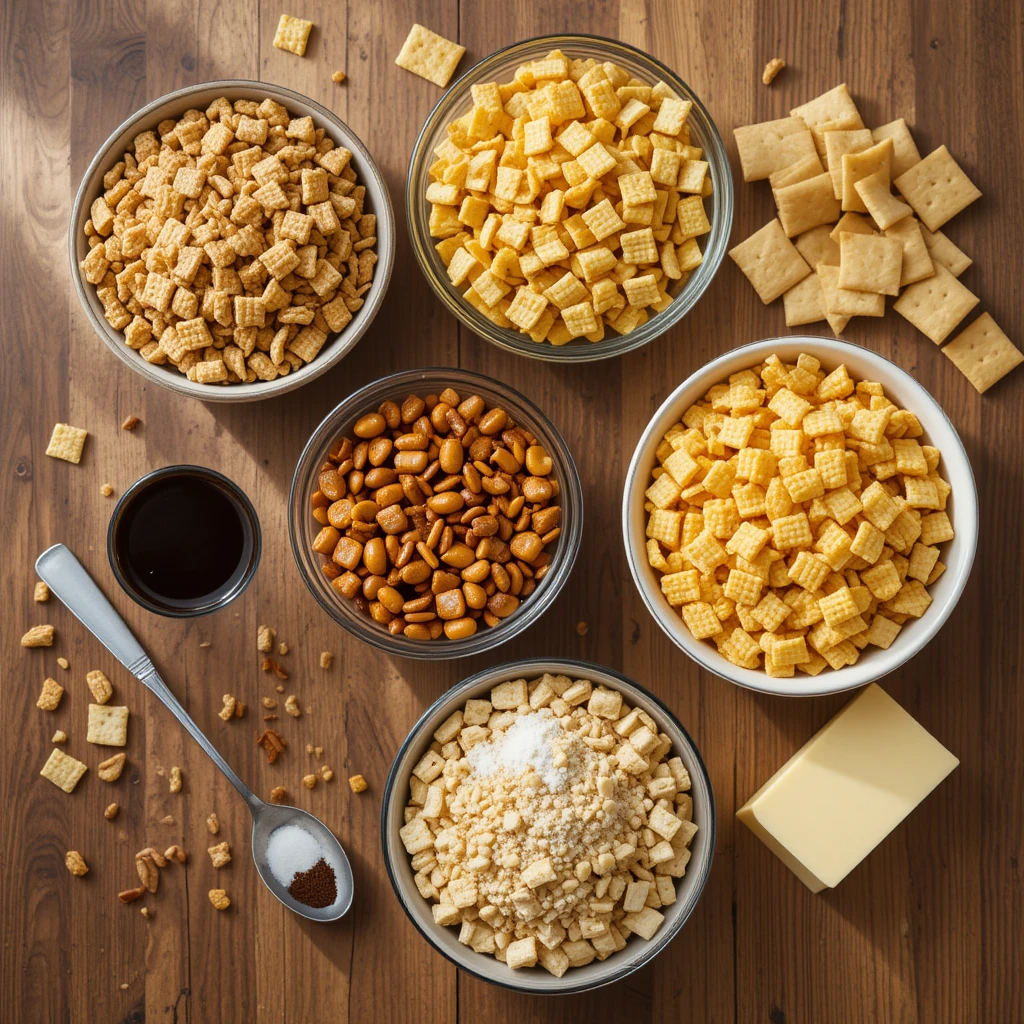
🥣 Base Mix
- 3 cups Rice Chex
- 3 cups Corn Chex
- 3 cups Wheat Chex
(Feel free to mix and match based on what you have!)
🥨 Crunchy Add-Ins
- 1 cup pretzels (mini twists or sticks work great)
- 1 cup mixed nuts (or peanuts, almonds, or cashews)
- 1 cup bagel chips or cheese crackers for extra texture
🧈 Seasoning Sauce
- 6 tablespoons unsalted butter, melted
- 2 tablespoons Worcestershire sauce
- 1½ teaspoons seasoned salt
- 1 teaspoon garlic powder
- ½ teaspoon onion powder
👩🍳 Ingredient Tips:
- Butter matters – Use real butter for the best flavor and crispiness.
- Worcestershire sauce – Adds that signature umami punch. No sub hits quite the same, but soy sauce can work in a pinch.
- Mix-ins – Don’t be afraid to get creative! Swap in your favorite crunchy snacks or make it spicy with a dash of cayenne.
Now that your ingredients are ready, let’s move on to the fun part—bringing it all together in the oven for that golden, crunchy finish.
How to Make Chex Mix Recipe Oven Style
Ready to turn that simple mix of cereal and snacks into something everyone will crave? This oven-baked Chex Mix is as fun to make as it is to eat. Follow these easy steps and you’ll have a perfectly crispy, savory snack that disappears fast—trust me.
🧑🍳 Step-by-Step Instructions
- Preheat your oven
Set your oven to 250°F (120°C). Low and slow is the key here for that golden crunch without burning. - Mix the dry ingredients
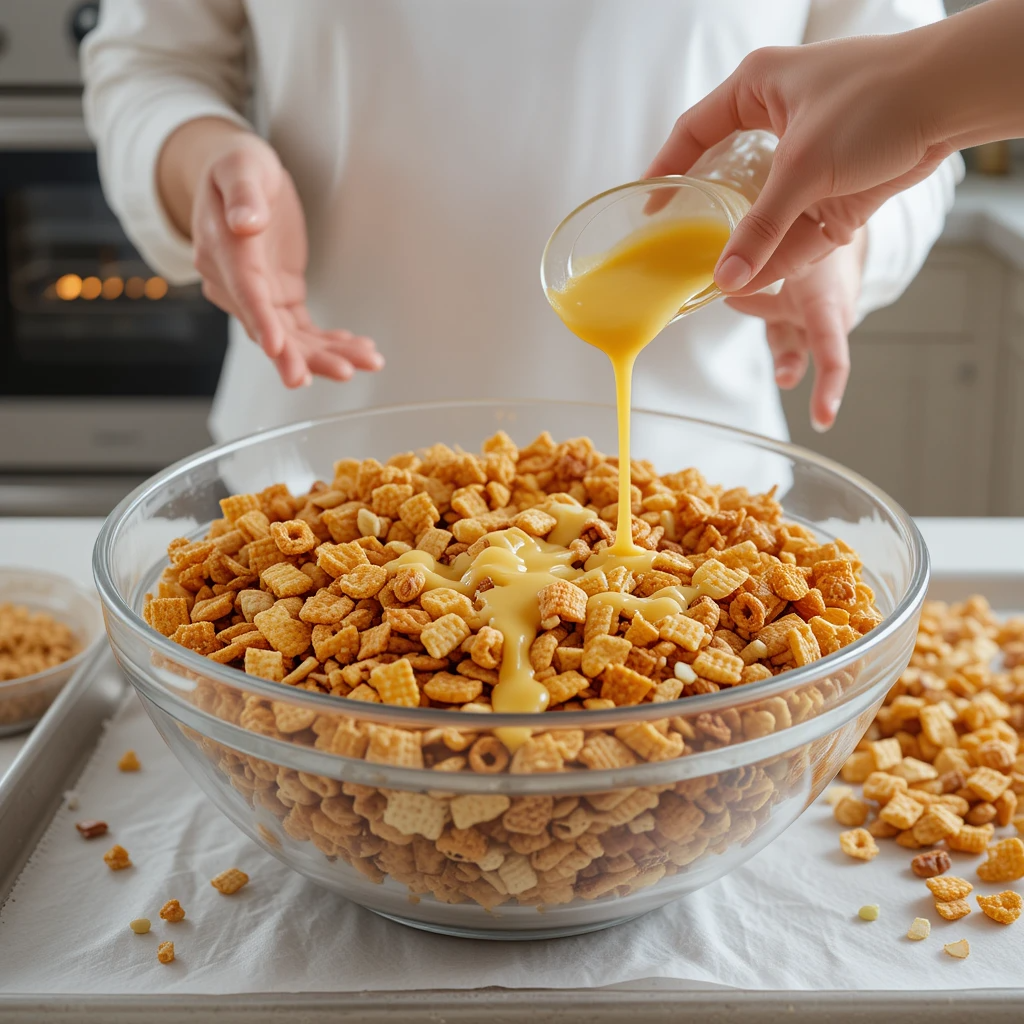
In a large mixing bowl, combine the Rice Chex, Corn Chex, Wheat Chex, pretzels, nuts, and any other mix-ins you’re using. Gently toss everything together so it’s evenly distributed. - Make the savory butter sauce
In a small bowl (or saucepan if you’re melting the butter fresh), stir together:- Melted butter
- Worcestershire sauce
- Seasoned salt
- Garlic powder
- Onion powder
Whisk it well until smooth and combined.
- Coat the mix
Slowly drizzle the butter mixture over the cereal mix, stirring gently as you go. You want an even coating so every bite is flavorful. Using a spatula makes this easier—and keeps things from breaking apart. - Bake to perfection
Spread the mix in a single layer on a large, parchment-lined baking sheet. Bake for 1 hour, stirring every 15 minutes to ensure even crisping. This step is crucial for getting that consistent, oven-toasted crunch. - Cool completely
Once it’s golden and fragrant, remove from the oven and let the mix cool completely on the baking sheet. It’ll continue to crisp up as it cools.
🔁 Quick Tip:
If you’re doubling the recipe, use two baking sheets to avoid overcrowding. Crowded pans = soggy mix, and nobody wants that.
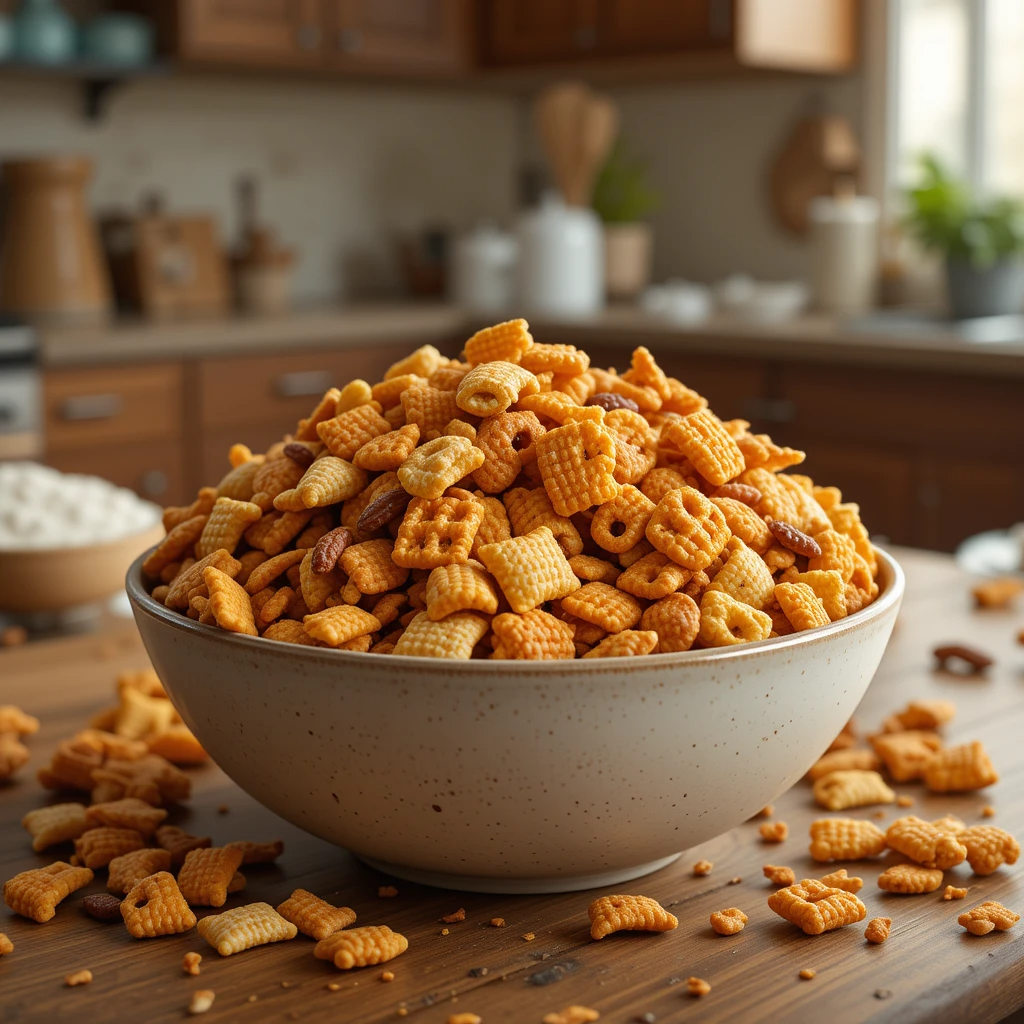
Once it’s cool, your homemade Chex Mix is ready to enjoy—or store for later (if you can resist). Let’s keep the fun going with tips on how to level up your batch!
Pro Tips and Fun Variations for Your Chex Mix Recipe Oven Style
Once you’ve mastered the classic version, it’s time to make it your own. Whether you’re looking to spice things up, keep it gluten-free, or store it like a snack pro—these tips and twists will help you get the most out of your oven-baked Chex Mix.
Pro Tips for Perfect Chex Mix Every Time
- Don’t skip the stirring
Stirring every 15 minutes while baking ensures even browning and prevents any mix-ins from over-toasting. - Use parchment paper
It makes cleanup a breeze and helps prevent sticking, especially with the buttery coating. - Cool completely before storing
Letting it cool on the pan helps it crisp up and keeps moisture from ruining your crunch when you store it. - Store smart
Keep your mix in an airtight container at room temperature for up to 10 days—though let’s be honest, it probably won’t last that long!
🔄 Flavor Variations to Try
Want to change things up? Here are some creative ways to switch flavors without reinventing the wheel:
- 🌶️ Spicy Kick
Add a pinch of cayenne pepper or a few dashes of hot sauce to the butter mixture for heat lovers. - 🧀 Cheesy Twist
Toss in some cheese crackers, or sprinkle grated Parmesan during the last 15 minutes of baking for an umami punch. - 🌿 Herb Blend
Stir in dried rosemary, thyme, or Italian seasoning for a more savory, earthy mix. - 🌾 Gluten-Free Option
Use gluten-free Chex varieties and swap pretzels for GF crackers or nuts. Always double-check labels to be safe. - 🧄 Garlic Lovers’ Dream
Increase the garlic powder or add a pinch of garlic salt for that bold, garlicky flavor.
The beauty of this Chex Mix recipe oven version is its flexibility. Whether you’re making a big batch for a party or tweaking it to match your snack cravings, there’s always room to get creative in the kitchen.
Serving Suggestions for Your Chex Mix Recipe Oven Edition
Now that your homemade Chex Mix is baked to crunchy perfection, let’s talk about how to serve it up in fun, crowd-pleasing ways. This isn’t just a snack—it’s your secret weapon for entertaining, gifting, and everyday munching.
🎉 Party-Ready Presentation
- Snack bowls on the table: Fill small bowls or ramekins with Chex Mix and scatter them around the party area. It’s a simple way to keep guests snacking and mingling.
- DIY snack bar: Hosting a movie night or game day gathering? Set up a self-serve snack mix station with a few flavor variations. Let guests scoop their favorites into cups or mini bags.
- Cocktail companion: This savory oven-baked mix pairs beautifully with beer, wine, or your favorite cocktails. It’s salty, satisfying, and balances out sweet or boozy sips.
🎁 Gifting & On-the-Go Ideas
- Edible gifts: Portion the cooled mix into clear treat bags or mason jars. Add a festive ribbon and a handwritten tag—instant holiday or hostess gift!
- Lunchbox filler: Skip the chips and add a handful of Chex Mix to lunchboxes for a crunchy, homemade snack that kids and adults both love.
- Road trip snack: Pack individual portions in zip-top bags or reusable containers. It’s mess-free, satisfying, and perfect for long drives or hikes.
🍽️ When to Serve It
This oven Chex Mix recipe fits into almost any occasion:
- Game day gatherings
- Birthday parties
- Holiday snack trays
- Family movie nights
- Casual get-togethers
- Office potlucks
No matter how you serve it, this crunchy, savory mix never fails to impress. Next up? A quick recap and some helpful answers to your most common Chex Mix questions!
Conclusion: Why You’ll Love This Chex Mix Recipe Oven Style
By now, you’ve learned just how easy and rewarding it is to make your own oven-baked Chex Mix. Whether you’re a seasoned snack maker or a newbie to the kitchen, this recipe is perfect for everyone. The best part? You get to control every ingredient, from the perfect crunch to the ideal seasoning blend. It’s a snack that’s guaranteed to please, no matter the occasion.
🍽️ Why You Should Make It
- Simple ingredients: You don’t need fancy pantry staples to create this delicious homemade mix.
- Customizable: Add your favorite nuts, crackers, or spices to make it uniquely yours.
- Perfect for sharing: Whether you’re entertaining or just looking for a quick snack, this mix will be the first thing to disappear.
So, next time you’re in the mood for something that’s crunchy, savory, and irresistibly addictive—this Chex Mix recipe oven-style is the way to go. It’s an easy, budget-friendly treat that’s always a hit. Now go ahead, make a batch (or two) and watch how fast it vanishes. Enjoy!
Chex Mix Recipe Oven Winner Everyone Craves Now
Ingredients
Method
- Set your oven to 250°F (120°C). Low and slow is the key here for that golden crunch without burning.
- In a large mixing bowl, combine the Rice Chex, Corn Chex, Wheat Chex, pretzels, nuts, and any other mix-ins you’re using. Gently toss everything together so it’s evenly distributed.
- In a small bowl (or saucepan if you’re melting the butter fresh), stir together:
- o Melted butter
- o Worcestershire sauce
- o Seasoned salt
- o Garlic powder
- o Onion powder
- Whisk it well until smooth and combined.
- Slowly drizzle the butter mixture over the cereal mix, stirring gently as you go. You want an even coating so every bite is flavorful. Using a spatula makes this easier—and keeps things from breaking apart.
- Spread the mix in a single layer on a large, parchment-lined baking sheet. Bake for 1 hour, stirring every 15 minutes to ensure even crisping. This step is crucial for getting that consistent, oven-toasted crunch.
- Cool completely
- Once it’s golden and fragrant, remove from the oven and let the mix cool completely on the baking sheet. It’ll continue to crisp up as it cools.
- If you’re doubling the recipe, use two baking sheets to avoid overcrowding. Crowded pans = soggy mix, and nobody wants that.
Notes
- Calories: 210 kcal
-
Fat: 11g
- Saturated Fat: 2g
-
Carbohydrates: 27g
- Fiber: 1g
- Sugars: 3g
- Protein: 3g
- Sodium: 300mg
- Cholesterol: 10mg
- Potassium: 100mg
FAQs About the Chex Mix Recipe Oven Style
You’ve got your ingredients, followed the steps, and now you’re ready to enjoy this chewy, crunchy, savory snack. But we know that sometimes questions pop up along the way. Let’s tackle some of the most common FAQs to make sure you’re totally confident in your Chex Mix-making skills.
1. Can I make this Chex Mix ahead of time?
Absolutely! This homemade Chex Mix is perfect for making in advance. After it cools, store it in an airtight container at room temperature for up to 10 days. It’ll stay crunchy and fresh for snacking whenever you need it.
2. Can I use other types of Chex cereal?
Yes! Feel free to swap the classic Rice, Corn, and Wheat Chex for other flavors or types you have on hand. Honey Nut Chex or Chocolate Chex can add a sweet twist, while Gluten-Free Chex works great for those with dietary restrictions.
3. How do I make this recipe spicier?
If you’re craving a little heat, you can easily spice things up! Add a pinch of cayenne pepper or chili powder to the seasoning mix. Alternatively, drizzle hot sauce over the Chex Mix before baking for an extra kick.
4. Can I make this recipe vegan?
Of course! Simply swap out the butter for a plant-based alternative like vegan butter or olive oil, and ensure the Worcestershire sauce is vegan-friendly (some brands contain anchovies). Your mix will be just as tasty and completely plant-based.
5. What can I use instead of pretzels?
If you’re not a fan of pretzels, you can substitute them with cheese crackers, crispy chickpeas, or even roasted chickpeas for a healthier option. The key is keeping that crunchy element!
6. Can I make this Chex Mix spicy sweet?
Yes! To balance the savory flavor, you can add a touch of sweetness. Drizzle a bit of maple syrup or honey over the mix before baking, or toss in some mini chocolate chips after baking for a sweet-salty combo.
7. How do I store leftovers?
Store your Chex Mix in a sealed container to keep it crisp. If you find it’s lost a little crunch after a few days, just pop it back in the oven at 250°F for 5-10 minutes to restore its crunchiness.
Got more questions? Don’t hesitate to leave a comment below—I’d love to help you out and hear how your version of this oven-baked Chex Mix turns out. Happy snacking!