Have you ever wondered if whipping cream can take your homemade paneer to the next level? If you love soft, creamy paneer with a rich texture, this simple yet game-changing tip is for you! Traditional paneer-making often relies on milk and an acidic curdling agent, but adding whipping cream creates an unbelievably smooth and luxurious consistency.
Whether you’re making restaurant-style paneer for curries or a melt-in-your-mouth snack, this technique ensures extra tenderness and flavor. Ready to transform your paneer-making process with this easy kitchen hack? Let’s dive in!
Key Benefits of Using Whipping Cream for Paneer
If you’ve ever struggled to achieve that soft, melt-in-your-mouth paneer, adding whipping cream to the process is a game-changer! This simple tweak enhances texture, making your homemade paneer richer and creamier. But why does it work so well? Here’s what makes it special:
Table of Contents
✅ Ultra-Creamy Texture – Whipping cream boosts the fat content, ensuring paneer stays silky and tender instead of turning crumbly.
✅ Restaurant-Style Quality – Ever wondered why restaurant paneer cubes are so soft? The secret lies in added cream, giving it that professional touch.
✅ Better Flavor Absorption – Creamy paneer soaks up spices and sauces beautifully, making it perfect for dishes like paneer butter masala and palak paneer.
✅ Versatile and Customizable – Whether you like firm cubes for grilling or soft crumbles for stuffing, whipping cream allows you to control the texture.
✅ No Extra Effort Needed – Just a splash of whipping cream during the milk curdling process makes all the difference—no complicated steps required!
By making this simple adjustment, you’ll elevate your paneer-making game effortlessly. Now, let’s dive into the ingredients you’ll need!
Ingredients for Creamy Homemade Paneer
Before we get started, let’s gather everything you need. Using whipping cream in this recipe ensures soft, rich, and luscious paneer, perfect for any dish.
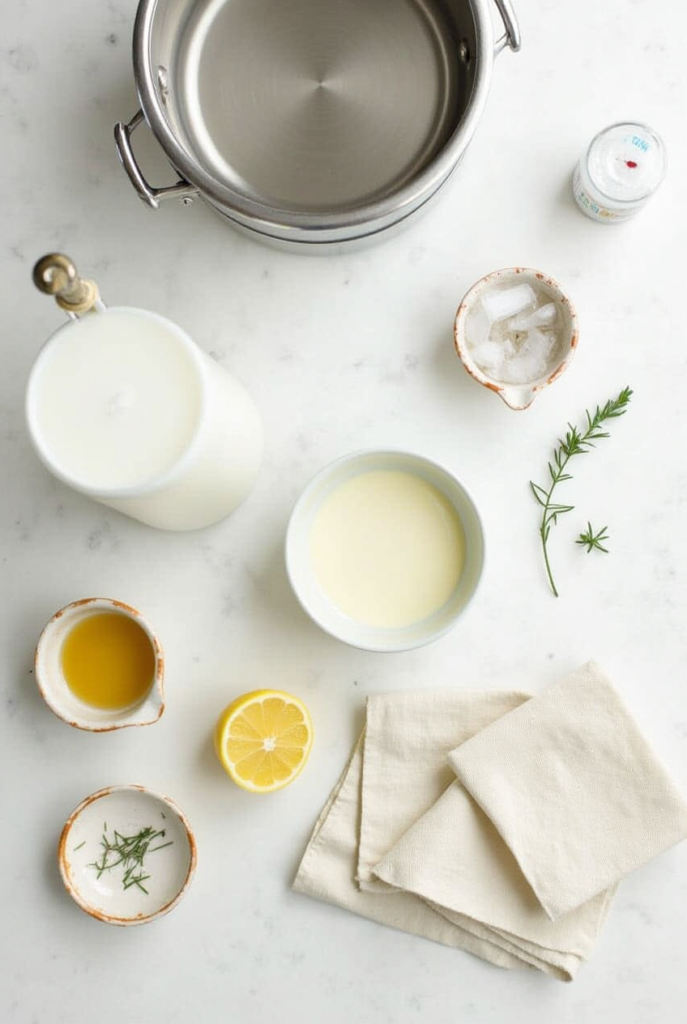
What You’ll Need:
- 1 liter full-fat milk – The higher the fat content, the creamier your paneer. Avoid skim or low-fat milk.
- ¼ cup whipping cream – This is the secret ingredient that enhances texture and richness.
- 2 tablespoons lemon juice or white vinegar – Helps curdle the milk and form the paneer solids.
- Ice-cold water – Stops the cooking process and helps firm up the paneer.
- Muslin cloth or cheesecloth – Essential for straining and shaping the paneer.
- Heavy-bottomed pot – Prevents milk from scorching while heating.
Pro Tip:
If you prefer softer paneer for dishes like shahi paneer or paneer bhurji, increase the whipping cream slightly. For firmer cubes ideal for grilling, reduce the cream to 2 tablespoons.
With these simple ingredients, you’re just a few steps away from making restaurant-quality paneer at home. Let’s move on to the step-by-step method!
How to Make Whipping Cream Paneer at Home
Making soft, creamy paneer with whipping cream is easier than you think! Follow these simple steps to achieve a rich, melt-in-your-mouth texture every time.
Step-by-Step Instructions
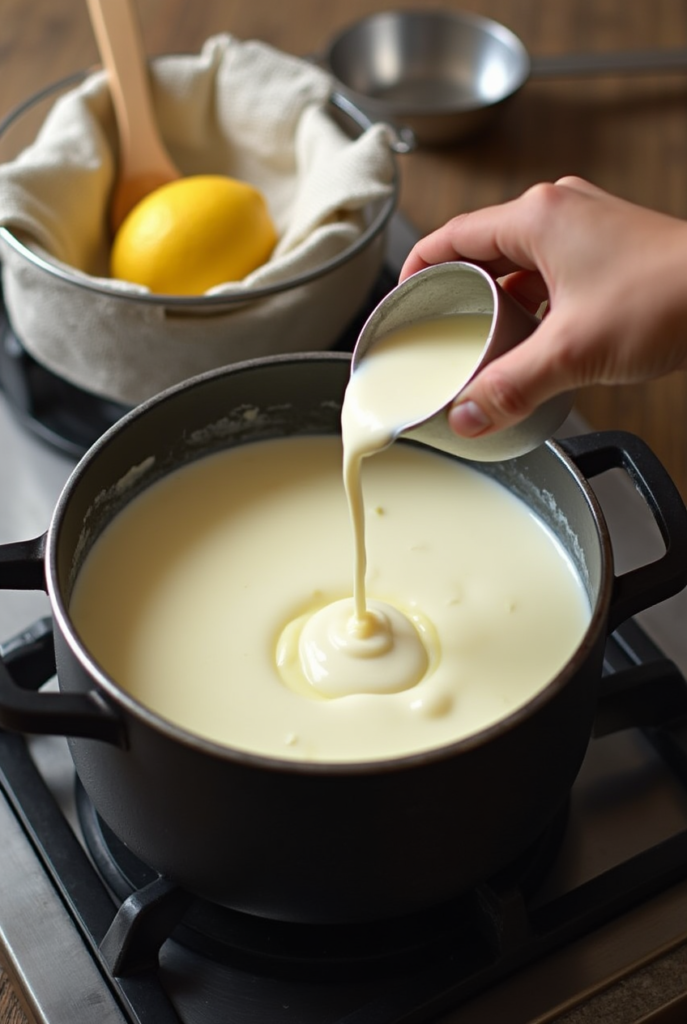
1- Heat the Milk and Whipping Cream
- Pour 1 liter of full-fat milk into a heavy-bottomed pot and place it over medium heat.
- Add ¼ cup whipping cream and stir gently to combine. This step enhances the creaminess of your paneer.
- Bring the mixture to a gentle boil, stirring occasionally to prevent scorching.
2- Curdle the Milk
- Reduce the heat to low and slowly add 2 tablespoons of lemon juice or vinegar, stirring continuously.
- You’ll notice the milk curdling, with the whey (greenish liquid) separating from the paneer solids.
- If the milk doesn’t curdle fully, add another 1 tablespoon of lemon juice and stir.
3- Strain and Rinse
- Line a colander with a muslin cloth and pour in the curdled mixture to strain out the whey.
- Rinse the paneer solids with ice-cold water to remove any tangy flavor and stop the cooking process.
4- Shape the Paneer
- Gather the edges of the muslin cloth and squeeze gently to remove excess water.
- Place the wrapped paneer on a flat surface and press it down with a heavy object (like a plate with a weight) for about 30 minutes.
- This step helps set the paneer block while keeping it soft and creamy.
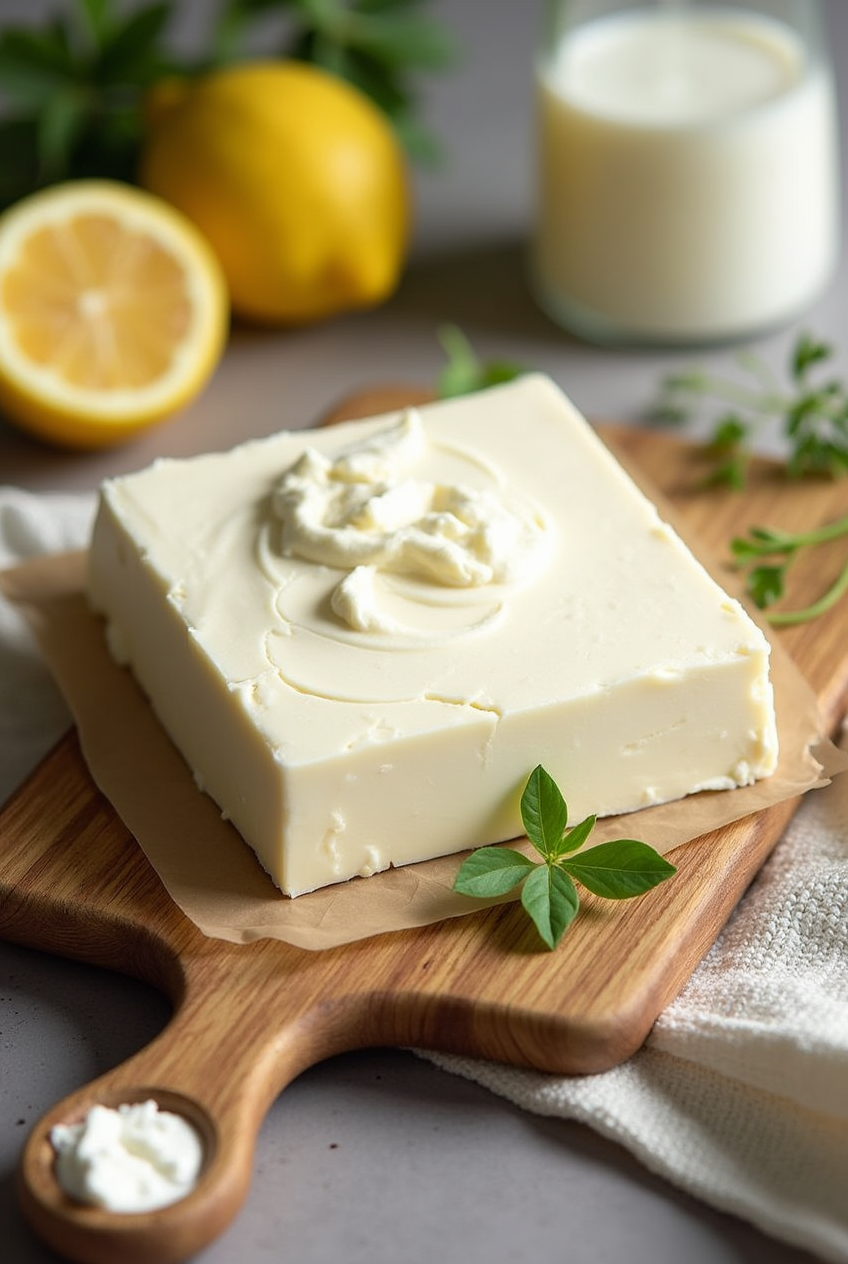
5- Cut and Store
- Once firm, unwrap and cut into cubes or crumble as needed.
- Store in an airtight container in the refrigerator for up to 3 days, or freeze for longer shelf life.
🔥 Quick Tip:
For extra soft paneer, let it rest for only 15-20 minutes instead of 30. If you need firmer cubes for frying or grilling, increase the pressing time to 1 hour.
Now that your homemade creamy paneer is ready, let’s explore some pro tips and variations to customize it further!
Pro Tips and Variations for the Best Whipping Cream Paneer
Want to take your homemade paneer to the next level? These expert tips and fun variations will help you customize texture, flavor, and versatility to match your favorite dishes!
⭐ Pro Tips for Perfect Paneer
✅ Use High-Fat Milk & Cream – For the best rich and creamy texture, always choose full-fat milk and whipping cream. Low-fat alternatives won’t yield the same softness.
✅ Control the Firmness – If you want softer paneer, press it for just 15-20 minutes. For firmer cubes, increase the pressing time to 1 hour and store it in the refrigerator before slicing.
✅ Rinse Well After Curdling – Washing the paneer solids with cold water helps remove any residual tang from the lemon juice or vinegar, giving you a neutral, fresh taste.
✅ Avoid Overheating the Milk – Boiling the milk too hard can make the paneer rubbery. Always heat it gently and gradually for a smooth, soft consistency.
🌿 Fun Variations to Try
🌶 Spiced Paneer – Add ½ teaspoon cumin seeds, crushed black pepper, or chili flakes while heating the milk for a subtly flavored paneer, perfect for Indian curries.
🧄 Herb-Infused Paneer – Mix in chopped cilantro, basil, or rosemary before pressing the paneer to create a delicious twist for wraps, salads, or grilled dishes.
🧀 Extra Creamy Malai Paneer – Increase the whipping cream to ⅓ cup for an ultra-rich, buttery-soft texture that’s ideal for dishes like shahi paneer or paneer korma.
🥗 Low-Fat Version – Want a lighter option? Reduce the whipping cream to 1 tablespoon for a slightly firmer yet still delicious homemade paneer.
By tweaking the ingredients and process slightly, you can create the perfect paneer for any recipe! Now, let’s talk about how to serve it best.
Serving Suggestions for Your Creamy Whipping Cream Paneer
Now that you’ve made your delicious, creamy paneer, it’s time to explore some mouthwatering ways to serve it! Whether you’re craving a classic curry, a fresh salad, or even a snack, your whipping cream paneer is incredibly versatile and perfect for any occasion.
🍛 Classic Curries and Gravies
One of the best ways to enjoy your homemade paneer is in rich, flavorful curries. The creaminess of the paneer enhances any curry sauce, making each bite decadent. Try it in:
- Paneer Butter Masala – A creamy, slightly sweet tomato-based curry with juicy paneer cubes.
- Palak Paneer – A smooth spinach gravy that’s a match made in heaven with your creamy paneer.
- Paneer Tikka Masala – Grilled spicy paneer cubes in a tangy tomato sauce.
🥗 Fresh Salads and Wraps
For a lighter option, cube or crumble your whipping cream paneer into refreshing salads or wraps:
- Paneer Salad – Toss paneer with fresh veggies, olive oil, lemon juice, and herbs for a quick and satisfying salad.
- Paneer Wraps – Add spiced paneer to a warm flatbread with lettuce, cucumber, and a tangy dressing. Perfect for a light lunch or dinner!
🍢 Grilled Paneer
Want to add a smoky touch to your paneer? Grill your creamy cubes! The rich texture makes them perfect for grilling or pan-searing:
- Grilled Paneer Skewers – Marinate your paneer in yogurt and spices, then grill for a crispy exterior and tender inside.
- Paneer Kebabs – Serve as appetizers or a main course with a side of mint chutney for extra flavor.
🍚 As a Side Dish
If you want a simple yet delicious side dish, serve your whipping cream paneer with:
- Jeera Rice – Lightly spiced cumin rice pairs beautifully with rich paneer curries.
- Naan or Roti – Soft, fluffy flatbreads are the perfect vehicle for soaking up all the curry goodness.
🧀 Homemade Paneer for Snacks
Don’t forget, your creamy paneer also makes for an amazing snack! Serve it:
- In a Cheese Sandwich – Add paneer slices, lettuce, and your favorite sauce between bread for a wholesome snack.
- Crispy Paneer Fries – Coat paneer cubes in breadcrumbs and shallow fry for a crispy, addictive snack.
The possibilities are endless when it comes to serving your whipping cream paneer. Whether you go the classic route with a curry or try something new with a fresh salad, your homemade paneer will always be the star of the dish.
Now that you have some tasty ideas, let’s wrap things up with a quick conclusion!
Conclusion: Why You’ll Love Whipping Cream Paneer
Making whipping cream paneer at home is one of the easiest and most rewarding kitchen hacks! By adding just a touch of whipping cream to the milk, you can elevate your homemade paneer to a whole new level of creaminess and flavor. The result is a soft, melt-in-your-mouth paneer that’s perfect for curries, salads, wraps, or even as a snack.
Whether you’re a beginner or an experienced cook, this simple yet transformative technique will help you create restaurant-quality paneer every time. Plus, with a few small tweaks, you can adjust the texture and richness to suit your tastes.
The beauty of making your own paneer is that you can customize it—whether you prefer it firmer for grilling or extra soft for creamy dishes. It’s a versatile ingredient that’s perfect for both everyday meals and special occasions.
So go ahead and give this whipping cream paneer recipe a try! I’m confident you’ll love the results. And remember, once you’ve mastered this simple technique, you can start exploring new variations, like adding spices or herbs, to make it uniquely yours!
Whipping Cream for Paneer Amazing Tip You Must Try
Ingredients
Method
- Pour 1 liter of full-fat milk into a heavy-bottomed pot and place it over medium heat.
- Add ¼ cup whipping cream and stir gently to combine. This step enhances the creaminess of your paneer.
- Bring the mixture to a gentle boil, stirring occasionally to prevent scorching.
- Reduce the heat to low and slowly add 2 tablespoons of lemon juice or vinegar, stirring continuously.
- You’ll notice the milk curdling, with the whey (greenish liquid) separating from the paneer solids.
- If the milk doesn’t curdle fully, add another 1 tablespoon of lemon juice and stir.
- Line a colander with a muslin cloth and pour in the curdled mixture to strain out the whey.
- Rinse the paneer solids with ice-cold water to remove any tangy flavor and stop the cooking process.
- Gather the edges of the muslin cloth and squeeze gently to remove excess water.
- Place the wrapped paneer on a flat surface and press it down with a heavy object (like a plate with a weight) for about 30 minutes.
- This step helps set the paneer block while keeping it soft and creamy.
- Once firm, unwrap and cut into cubes or crumble as needed.
- Store in an airtight container in the refrigerator for up to 3 days, or freeze for longer shelf life.
Notes
- Calories: 250 kcal
-
Fat: 18g
- Saturated Fat: 11g
- Protein: 12g
-
Carbohydrates: 7g
- Fiber: 0g
- Sugar: 5g
- Cholesterol: 50mg
- Sodium: 45mg
- Calcium: 200mg
- Iron: 1mg
FAQs About Making Whipping Cream Paneer
Got questions? Don’t worry, I’ve got you covered! Here are some of the most common queries about making whipping cream paneer, along with practical tips to ensure your cooking experience is smooth and successful.
1. Can I use low-fat milk instead of full-fat milk?
It’s best to use full-fat milk for the creamiest texture. Low-fat milk may result in paneer that’s a bit firmer and less creamy. If you’re looking for a lighter option, consider adjusting the whipping cream quantity for a slightly lower fat content.
2. Can I substitute lemon juice with vinegar?
Yes! Both lemon juice and white vinegar work well to curdle the milk. The choice depends on your personal taste—lemon juice adds a mild tang, while vinegar tends to be more neutral.
3. How long can I store homemade paneer?
You can store whipping cream paneer in an airtight container in the fridge for up to 3 days. If you want to keep it longer, freeze it for up to 2 months. Just make sure to thaw it properly before using it in your dishes.
4. Can I use this paneer for grilling?
Absolutely! The whipping cream helps make the paneer soft yet sturdy, perfect for grilling. If you’re making grilled paneer skewers or paneer tikka, pressing the paneer for a longer time will help it hold its shape.
5. Why is my paneer too crumbly?
If your paneer turns out too crumbly, it could be due to over-pressing or using milk that’s not rich enough. Ensure you’re using full-fat milk and don’t press the paneer for too long, especially if you want a softer texture.
6. Can I add flavors to the paneer?
Yes, definitely! You can infuse the whipping cream paneer with various herbs or spices like cumin, turmeric, or garlic. Try adding them when you’re heating the milk to create a flavored base, or mix them in just before pressing for an extra burst of flavor!
7. How can I make the paneer softer?
To make your paneer even softer, reduce the pressing time to around 15-20 minutes instead of 30 minutes. Additionally, you can increase the amount of whipping cream for an extra indulgent, soft texture.
I hope these tips help you create perfect whipping cream paneer every time! If you have any more questions, feel free to reach out, and happy cooking!