Craving a light and tangy treat that doesn’t require turning on the oven? These No-Bake Lemon Ricotta Cheesecake Bars might just be your new go-to dessert. With a creamy ricotta filling, a burst of fresh lemon zest, and a buttery graham cracker crust, they’re the perfect combination of refreshing and indulgent — especially on warm days when baking is the last thing on your mind.
Whether you’re hosting a summer get-together or just need a make-ahead treat to brighten your week, this easy no-bake cheesecake delivers big flavor with minimal effort. Ready to chill out with something sweet? Let’s dive in.
Key Benefits
If you’re anything like me, you’re always on the lookout for desserts that hit that sweet spot between easy to make and impressively delicious. These No-Bake Lemon Ricotta Cheesecake Bars check all the boxes — and then some. Here’s why you’ll love making (and sharing) them:
Table of Contents
No Oven Required
No need to heat up the kitchen — these bars set beautifully in the fridge. It’s the ideal no-bake dessert for summer days, last-minute get-togethers, or whenever you’re craving something cool and creamy.
Fresh Lemon Flavor
The combination of lemon juice and lemon zest gives each bite a refreshing citrus burst. It’s bright, tangy, and perfectly balanced by the creamy texture — a flavor profile that feels both indulgent and light.
Creamy Yet Light Texture
Thanks to the blend of ricotta cheese and cream cheese, the filling is silky smooth without being overly rich. It feels fancy, but you’ll be surprised how approachable it is — no baking skills required.
Quick to Assemble
With a simple graham cracker crust and an easy, whipped filling, these bars come together in minutes. The hardest part? Waiting for them to chill.
Perfect Make-Ahead Treat
Planning ahead? These cheesecake bars hold up wonderfully in the fridge, making them great for prepping the night before a gathering — or just having a sweet stash on hand.
Beginner-Friendly with Room to Customize
Whether you’re a seasoned baker or just getting started, this recipe walks you through each step with ease. Want to mix it up? Add berries, swap in lime zest, or serve in jars for a personalized twist.
These easy no-bake cheesecake bars are more than just pretty squares — they’re a reliable go-to for flavor, flexibility, and zero stress. Ready to see how simple indulgence can be? Let’s move on to the ingredients!
Ingredients
Let’s talk ingredients — because the beauty of these No-Bake Lemon Ricotta Cheesecake Bars lies in their simplicity. You don’t need anything fancy, just a few quality staples that come together to create a dessert that’s fresh, creamy, and completely irresistible.
Here’s what you’ll need:
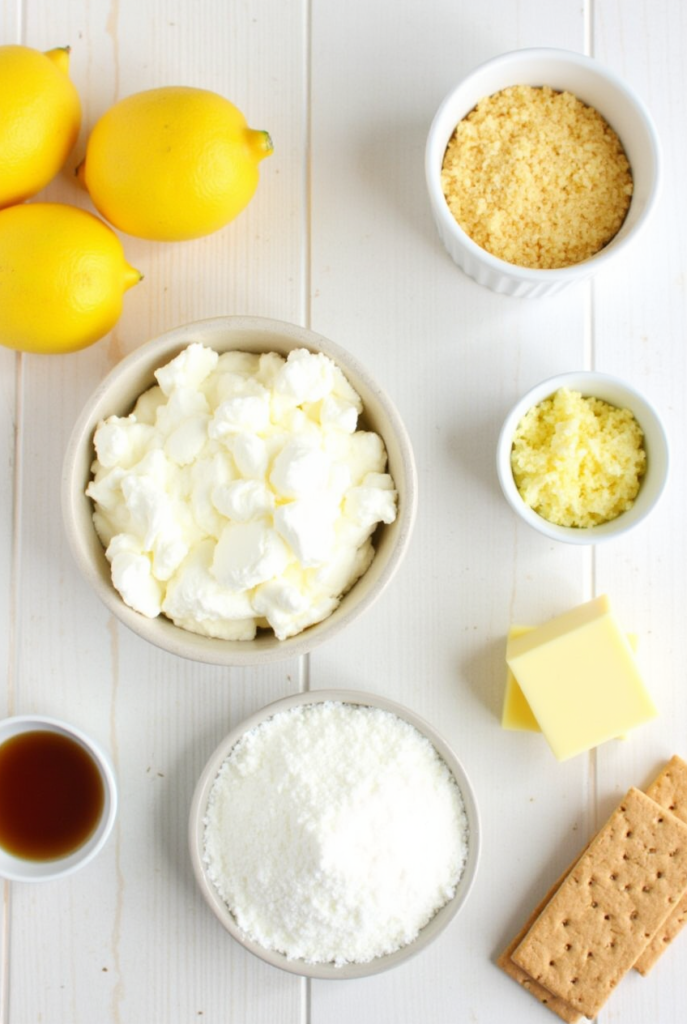
For the Graham Cracker Crust
- 1 ½ cups graham cracker crumbs
This creates a buttery, slightly crunchy base that perfectly contrasts the creamy filling. - ¼ cup granulated sugar
Adds just enough sweetness to balance the tangy lemon notes. - 6 tablespoons unsalted butter, melted
Helps the crust hold its shape and adds rich flavor.
For the Lemon Ricotta Cheesecake Filling
- 1 cup ricotta cheese (whole milk)
Provides a light, slightly grainy texture and subtle sweetness — key to that classic ricotta cheesecake feel. - 8 oz cream cheese, softened
For a smooth, luscious texture that gives structure to the filling. - ½ cup powdered sugar
Blends seamlessly into the mix for gentle, even sweetness. - 2 tablespoons fresh lemon juice
Brightens every bite with vibrant citrus flavor. - 1 tablespoon lemon zest
Adds a pop of aromatic lemon oil and deepens the citrus flavor. - 1 teaspoon vanilla extract
Rounds out the tangy notes with a warm, mellow finish.
Optional Garnishes
- Thin lemon slices or zest curls
- Fresh berries
- Mint leaves
- A dusting of powdered sugar
Pro Tip:
When possible, use fresh lemons — the flavor difference is huge. Bottled juice just won’t deliver the same bright, zesty punch. And be sure to zest your lemon before juicing to make the process easier.
With your ingredients ready to go, you’re just a few steps away from whipping up a dessert that feels like sunshine in bar form. Let’s get to the fun part: putting it all together!
How to Make No-Bake Lemon Ricotta Cheesecake Bars
Ready to bring these No-Bake Lemon Ricotta Cheesecake Bars to life? You’ll love how simple and rewarding this process is. No oven, no water bath — just a few bowls, a bit of mixing, and some time in the fridge. Let’s walk through it together, step by step.
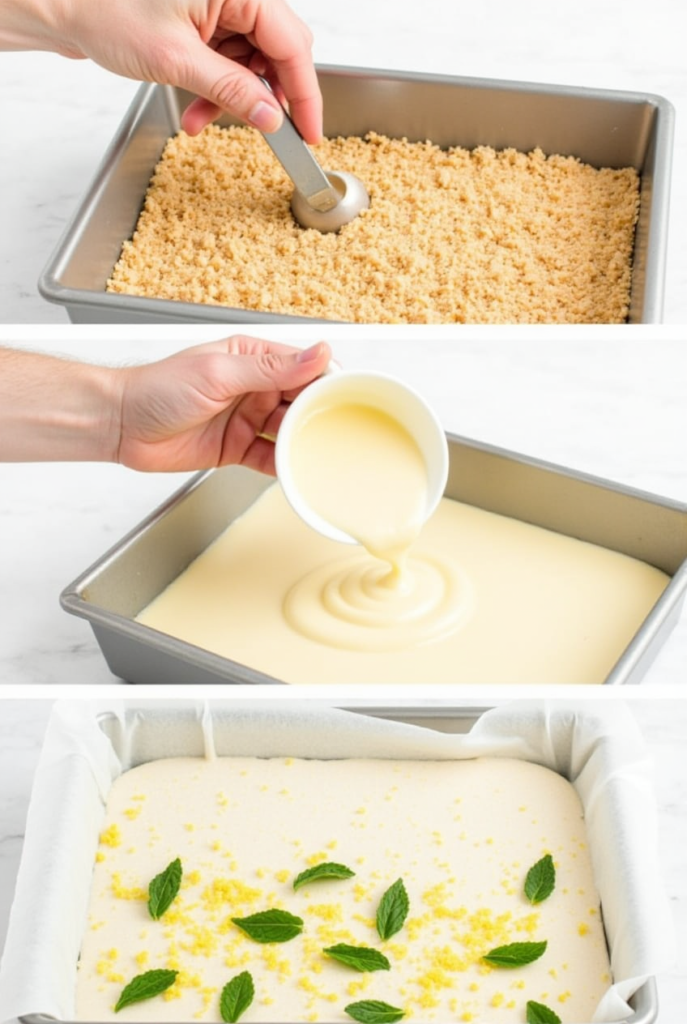
Step 1: Make the Graham Cracker Crust
- Crush the graham crackers into fine crumbs using a food processor or by placing them in a zip-top bag and crushing with a rolling pin.
- In a mixing bowl, combine graham cracker crumbs, granulated sugar, and melted butter.
- Stir until the crumbs are fully moistened and have the texture of wet sand.
- Press the mixture firmly into the bottom of a parchment-lined 8×8-inch baking dish.
Tip: Use the back of a measuring cup for an even, compact layer. - Place the crust in the freezer while you make the filling — this helps it set quickly.
Step 2: Prepare the Lemon Ricotta Filling
- In a large bowl, beat the ricotta and cream cheese together until smooth and fluffy using a hand mixer or stand mixer.
- Add in powdered sugar, lemon juice, lemon zest, and vanilla extract.
- Continue mixing until fully incorporated and the filling is creamy with no lumps.
Tip: For extra smoothness, you can blend the ricotta first before mixing it with the cream cheese.
Step 3: Assemble and Chill
- Remove the crust from the freezer and spread the lemon ricotta mixture evenly over the crust.
- Smooth the top with a spatula for a clean finish.
- Cover with plastic wrap and refrigerate for at least 4 hours — or overnight, if you can wait!
This gives the bars time to set up properly and makes slicing a breeze.
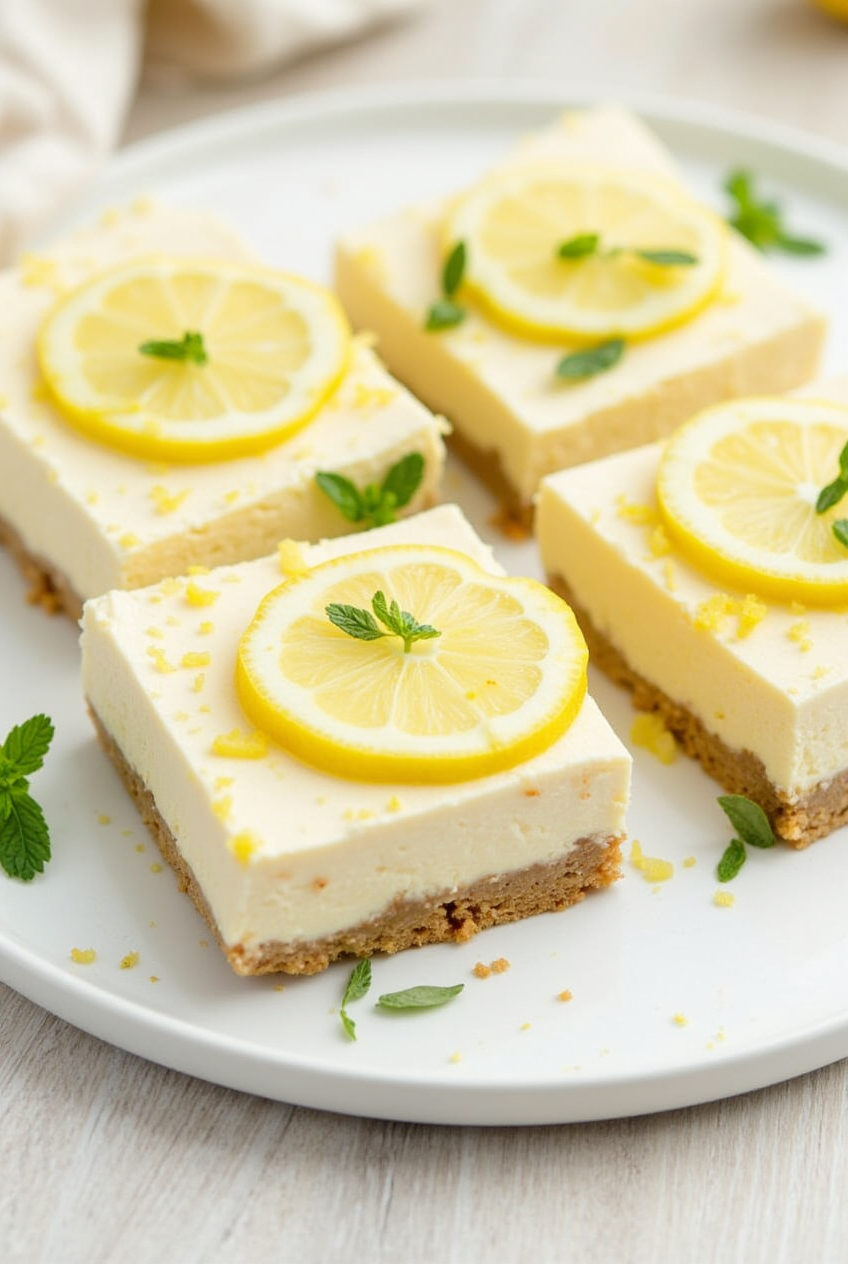
Step 4: Slice and Serve
- Once fully chilled, lift the bars out using the parchment overhang.
- Slice into clean squares using a sharp knife — wiping between cuts for neat edges.
- Garnish with lemon zest curls, fresh berries, or mint for a picture-perfect finish.
There you have it — creamy, zesty, perfectly chilled cheesecake bars that look bakery-fancy but come together effortlessly in your own kitchen. It’s the kind of dessert you’ll make once and keep coming back to again and again. Ready to get creative with some pro tips and tasty variations? Let’s keep going!
Pro Tips and Variations
Once you’ve mastered the basics of these No-Bake Lemon Ricotta Cheesecake Bars, the fun really begins. This recipe is incredibly forgiving and endlessly flexible — perfect for putting your own spin on things. Below, you’ll find expert tips to get the best results every time, along with creative variations to keep your cheesecake bars fresh and exciting.
Pro Tips for Perfect Bars
- Use full-fat ricotta and cream cheese
The texture and richness are worth it. Low-fat versions tend to be watery and can affect the set. - Room temperature is key
Soften your cream cheese before mixing to avoid lumps. Cold ingredients won’t blend as smoothly. - Chill thoroughly before slicing
Don’t rush this step! At least 4 hours of chilling ensures the bars hold their shape when cut. - Line your pan with parchment paper
It makes removing and slicing the bars so much easier — no stuck crust, no crumbling edges. - Wipe your knife between cuts
This little trick helps you get those clean, bakery-style slices every time.
Delicious Variations to Try
- Berry Swirl Bars
Drop spoonfuls of raspberry or blueberry jam onto the filling before chilling. Swirl with a toothpick for a marbled effect and fruity twist. - Gluten-Free Option
Swap graham crackers for gluten-free cookies or almond flour mixed with butter and a bit of sugar. - Lime or Orange Zest Twist
Substitute lemon with lime or orange zest and juice for a different citrus flavor. Just as refreshing, with a unique zing. - Mini Cheesecake Jars
Layer the crust and filling into small mason jars or cups for individual no-bake desserts — perfect for parties or picnics. - Honey or Maple-Sweetened
Want to avoid refined sugar? Replace the powdered sugar with a few tablespoons of honey or pure maple syrup to taste.
These tips and twists turn a great recipe into one that fits your mood, your pantry, or your guest list. Whether you’re keeping it classic or mixing it up, there’s no wrong way to enjoy this chilled citrus delight. Let’s move on to making it look as good as it tastes — serving suggestions coming up next!
Serving Suggestions
Now that your No-Bake Lemon Ricotta Cheesecake Bars are perfectly chilled and sliced, it’s time to dress them up and serve them in style. Whether you’re entertaining guests or enjoying a quiet moment of indulgence, how you present these creamy lemon bars can elevate the entire experience.
When to Serve Them
These easy, no-bake bars are incredibly versatile and shine in a variety of settings:
- Brunch Buffets: A light, citrusy addition next to pastries and fresh fruit.
- Spring or Summer Gatherings: Cool and refreshing — they’re made for warm-weather occasions.
- Tea Parties or Bridal Showers: Elegant and easy to portion.
- Weeknight Treats: Chill ahead for a stress-free dessert after dinner.
Topping Ideas to Add a Wow Factor
Amp up flavor and presentation with these topping options:
- Fresh Berries: A handful of raspberries, blueberries, or sliced strawberries adds a pop of color and natural sweetness.
- Candied Lemon Slices or Zest Curls: Keep the citrus theme strong with a garnish that’s as pretty as it is flavorful.
- Whipped Cream or Greek Yogurt Dollop: Add creaminess and a soft contrast to the firm, chilled bars.
- Crushed Pistachios or Toasted Coconut: Sprinkle for texture, crunch, and a touch of elegance.
- Honey Drizzle: Just a light drizzle over the top before serving adds sheen and floral sweetness.
How to Store and Serve Later
- Fridge: Store in an airtight container for up to 5 days. They actually taste even better the next day as the flavors meld.
- Freezer-Friendly: Freeze in a single layer, then transfer to a container with parchment between bars. Thaw in the fridge for a few hours before serving.
Tip: Serve them slightly chilled for the best texture — not rock-solid cold and not room-temp soft. Somewhere in between keeps that creamy consistency just right.
However you plate them, these no-bake lemon cheesecake bars are guaranteed to turn heads and earn compliments. Let’s wrap things up with a quick recap and helpful FAQs to make sure you’re ready to enjoy every bite.
Conclusion
There you have it — No-Bake Lemon Ricotta Cheesecake Bars that are as easy to love as they are to make. With their bright citrus flavor, smooth creamy filling, and buttery graham cracker crust, these chilled bars strike the perfect balance between refreshing and indulgent. They’re proof that you don’t need an oven (or hours in the kitchen) to create a show-stopping dessert.
Whether you’re preparing a quick treat for family, impressing guests at a summer get-together, or just treating yourself to a little slice of sunshine, this recipe delivers every time. It’s flexible enough to adapt with seasonal twists and simple enough for even beginner bakers to nail.
Don’t forget — these bars taste even better after a day in the fridge, so they’re a perfect make-ahead option. Just slice, serve, and watch them disappear.
Looking for more no-bake desserts or citrus-inspired creations? Bookmark this recipe, share it with a friend, and let your kitchen be a place where joy and ease go hand in hand.
No-Bake Lemon Ricotta Cheesecake Bars to Love
Ingredients
Method
- Crush the graham crackers into fine crumbs using a food processor or by placing them in a zip-top bag and crushing with a rolling pin.
- In a mixing bowl, combine graham cracker crumbs, granulated sugar, and melted butter.
- Stir until the crumbs are fully moistened and have the texture of wet sand.
- Press the mixture firmly into the bottom of a parchment-lined 8×8-inch baking dish.
- Tip: Use the back of a measuring cup for an even, compact layer.
- Place the crust in the freezer while you make the filling — this helps it set quickly.
- In a large bowl, beat the ricotta and cream cheese together until smooth and fluffy using a hand mixer or stand mixer.
- Add in powdered sugar, lemon juice, lemon zest, and vanilla extract.
- Continue mixing until fully incorporated and the filling is creamy with no lumps.
- Tip: For extra smoothness, you can blend the ricotta first before mixing it with the cream cheese.
- Remove the crust from the freezer and spread the lemon ricotta mixture evenly over the crust.
- Smooth the top with a spatula for a clean finish.
- Cover with plastic wrap and refrigerate for at least 4 hours — or overnight, if you can wait!
- This gives the bars time to set up properly and makes slicing a breeze.
- Once fully chilled, lift the bars out using the parchment overhang.
- Slice into clean squares using a sharp knife — wiping between cuts for neat edges.
- Garnish with lemon zest curls, fresh berries, or mint for a picture-perfect finish.
Notes
| Nutrient | Amount |
|---|---|
| Calories | 285 kcal |
| Total Fat | 18g |
| Saturated Fat | 11g |
| Cholesterol | 55mg |
| Sodium | 160mg |
| Carbohydrates | 26g |
| Sugar | 18g |
| Protein | 5g |
| Fiber | 1g |
FAQs
Let’s wrap things up with some quick answers to the most common questions about making No-Bake Lemon Ricotta Cheesecake Bars. Whether you’re a first-timer or a returning fan, these tips can help troubleshoot and perfect your experience.
❓ Can I use store-bought lemon juice instead of fresh?
You can, but fresh lemon juice truly makes a difference. It delivers that bright, clean citrus flavor that balances the creamy filling beautifully. If you’re in a pinch, opt for a high-quality bottled lemon juice with no additives.
❓ How do I make sure my cheesecake bars are firm enough to slice?
The key is proper chilling. Make sure the bars are refrigerated for at least 4 hours — overnight is even better. Also, use full-fat dairy ingredients; low-fat versions can make the filling too soft to set well.
❓ Can I substitute the ricotta cheese?
Yes! While ricotta gives these bars a light, slightly textured finish, you can swap it for mascarpone or more cream cheese for a smoother, richer bite. Just be mindful that flavor and texture will change slightly.
❓ Are these bars freezer-friendly?
Absolutely. Freeze them in a single layer, then transfer to an airtight container with parchment between layers. When ready to enjoy, thaw in the fridge for a few hours. The texture holds up surprisingly well.
❓ What’s the best way to prevent the crust from crumbling?
Make sure your graham cracker crust is well mixed and firmly pressed into the pan. Chilling the crust before adding the filling also helps it set, making slicing much easier.
These FAQs are here to make your cheesecake journey smooth and satisfying. If you have any other questions, don’t hesitate to drop them in the comments — baking (even no-baking!) is always better when shared. Ready to slice into sunshine? Let the chilling begin!