Ever craved a dessert that’s fun to make, easy to serve, and guaranteed to impress? These Ice Cream Sandwich Cake Pops are exactly that kind of treat. Perfect for summer parties, kids’ birthdays, or anytime you want a bite-sized frozen dessert that brings joy to every age, this recipe transforms classic ice cream sandwiches into no-bake cake pops with a chocolaty twist.
Whether you’re a busy parent looking for a mess-free dessert or a dessert lover seeking a playful party idea, this one checks all the boxes. Ready to whip up something simple, sweet, and seriously addictive? Let’s turn your freezer favorites into the ultimate frozen cake pop snack.
Key Benefits of Ice Cream Sandwich Cake Pops
There’s a reason these Ice Cream Sandwich Cake Pops are such a hit—they combine all the things we love about dessert into one bite-sized treat! Here’s why you’ll want to keep this recipe in your back pocket:
Table of Contents
No-Bake and Fuss-Free
No oven? No problem. These pops are made without baking, which means less prep and less mess. It’s a perfect go-to when you want something sweet without heating up the kitchen—especially during hot summer days.
Fun to Make and Share
Getting kids involved? These are a blast to assemble! Dipping, decorating, and eating—each step adds a little joy. They’re great for birthday parties, playdates, or just some weekend family fun.
Customizable Flavors
Chocolate, vanilla, mint chip—whatever your favorite ice cream sandwich, you can turn it into a cake pop. Add sprinkles, crushed cookies, or candy bits to create your own signature version.
Perfect for Make-Ahead Treats
Since they’re stored in the freezer, these cake pops are ideal for prepping ahead of time. Make a batch, stash them in an airtight container, and you’ve got a party-ready dessert anytime you need it.
Bite-Sized, Mess-Free Dessert
Say goodbye to melting ice cream dripping down your fingers. These pops are easy to eat, hold their shape longer, and are just the right size to satisfy your sweet tooth without going overboard.
With these benefits, it’s no wonder frozen cake pop snacks are becoming the go-to treat for party planners, busy parents, and dessert lovers alike. Ready to try them out? Let’s move on to the ingredients you’ll need!
Ingredients for Ice Cream Sandwich Cake Pops
You won’t need a long shopping list or fancy tools to make these ice cream sandwich cake pops—just a few easy-to-find ingredients and some freezer space. Here’s everything you’ll need to whip up this fun frozen treat:
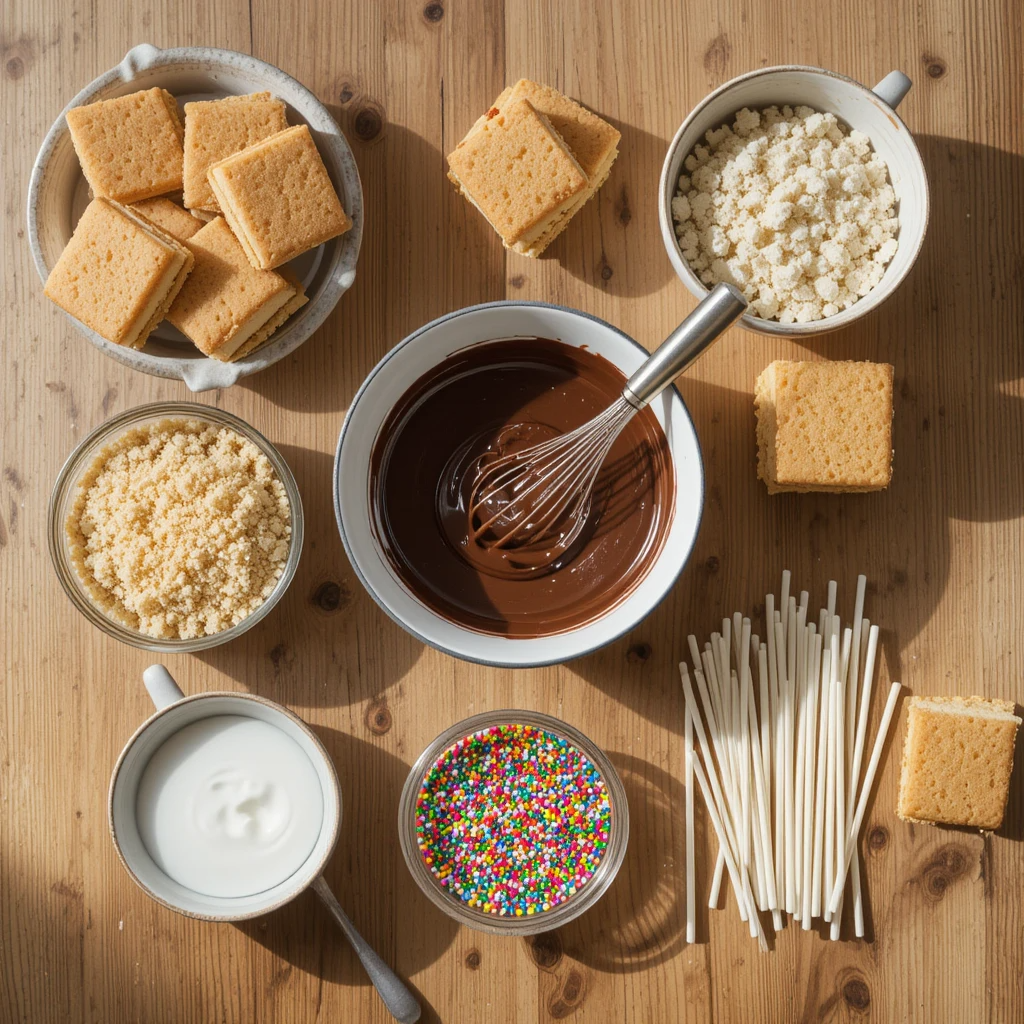
Main Ingredients
- 6–8 ice cream sandwiches (any flavor—classic vanilla, mint chip, or cookies and cream work great)
- 1 cup crushed cake or brownie crumbs (store-bought or leftovers—adds texture and richness)
- 1½ cups chocolate or candy melts (white, milk, or dark chocolate, depending on your mood)
- 2 tablespoons heavy cream or coconut oil (helps melt chocolate smoothly for coating)
- Sprinkles, crushed nuts, or mini candies (optional—for decorating and added crunch)
- Lollipop sticks or cake pop sticks
Optional Flavor Boosters
- 1 teaspoon vanilla or almond extract (mix into the crumb layer for extra flavor)
- Mini chocolate chips or cookie bits (fold into the cake pop mixture for added texture)
Quick Tip
If you’re short on time, use pre-crumbled cake or a boxed brownie mix the day before. The goal is a soft but moldable filling that holds its shape when frozen and dipped.
Having everything prepped and ready will make assembly a breeze—especially when working with frozen elements. Now that your ingredients are lined up, let’s get into the fun part: making the pops!
How to Make Ice Cream Sandwich Cake Pops
Ready to turn your favorite frozen treat into bite-sized cake pops that are as fun to make as they are to eat? Here’s a simple step-by-step guide that walks you through the process from mixing to dipping—no oven required.
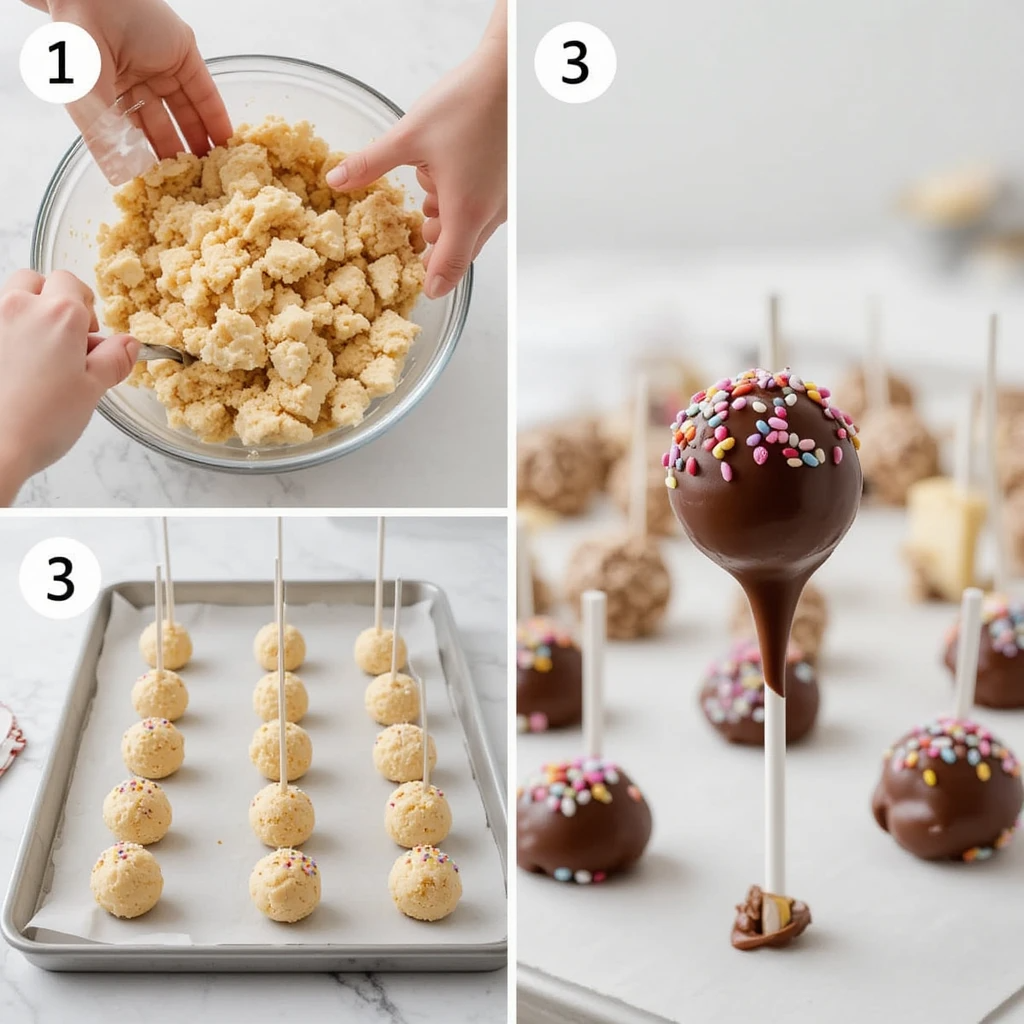
1. Soften and Crumble the Ice Cream Sandwiches
Take the ice cream sandwiches out of the freezer and let them sit at room temperature for about 5 minutes—just enough to soften slightly.
- Place the softened sandwiches in a large mixing bowl.
- Use a spoon or your hands to mash and mix them into a soft, uniform mixture.
- Add in the cake or brownie crumbs, stirring until fully combined and moldable.
The texture should be like cookie dough—firm enough to roll, but not too sticky.
2. Roll into Balls
Scoop the mixture into even portions using a cookie scoop or tablespoon.
- Roll into balls about 1 to 1½ inches wide.
- Place them on a parchment-lined baking sheet.
- Insert a lollipop stick into the center of each ball.
Freeze the pops for 1 hour, or until completely firm. This step is key to making sure they don’t fall apart during dipping.
3. Melt and Prepare the Coating
While the pops are freezing, melt your chocolate or candy melts in a heatproof bowl.
- Add a little heavy cream or coconut oil to help the chocolate stay smooth and glossy.
- Stir until silky and pourable—perfect for coating.
🫠 Use a double boiler or microwave in short bursts, stirring frequently to avoid burning.
4. Dip, Decorate, and Chill
Remove the frozen pops from the freezer and begin dipping:
- Hold each pop by the stick and dip into the melted chocolate, gently twirling to coat evenly.
- Tap off the excess and quickly add sprinkles, nuts, or other toppings before the coating sets.
- Return pops to the parchment-lined sheet and place back in the freezer for 15–20 minutes to set.
And just like that, you’ve got a tray of homemade ice cream sandwich cake pops—ready to delight at your next party or satisfy that frozen dessert craving anytime. Let’s explore some pro tips and tasty variations next!
Pro Tips and Fun Variations
Once you’ve nailed the basic version of these ice cream sandwich cake pops, there’s plenty of room to get creative. Whether you’re catering to picky eaters or just want to elevate the fun, these tips and twists will help you level up your frozen treat game.
Pro Tips for Perfect Pops
- Work in batches: Keep some pops in the freezer while you dip others. This prevents them from softening too much and falling apart.
- Use a deep, narrow cup for dipping: It makes it easier to get a smooth, full chocolate coating without excess pooling.
- Stabilize the sticks: Dip the tip of each stick in melted chocolate before inserting it into the pop—this helps anchor it as the chocolate sets.
- Chill your toppings: If you’re adding candy or crushed cookies, keep them cool so they stick better to the warm chocolate coating without melting or sliding off.
Tasty Variations to Try
- Flavor Swaps
Use flavored ice cream sandwiches like mint chocolate chip, Neapolitan, or peanut butter for a unique spin. - Coating Combos
Alternate between white chocolate, dark chocolate, and colorful candy melts for a fun and festive assortment. - Themed Pops
Add seasonal sprinkles or colored sugar for holidays, birthdays, or special events—red, white, and blue for summer BBQs or pastel confetti for baby showers. - Add a Crunch
Roll coated pops in crushed pretzels, mini M&Ms, or toasted coconut flakes before the chocolate sets. - Dairy-Free Friendly
Opt for non-dairy ice cream sandwiches and vegan chocolate coating to accommodate dietary needs without losing flavor or fun.
These easy ice cream cake pop variations are great for parties, gifts, or just changing things up on a whim. With a little creativity, the possibilities are endless—and always delicious. Ready to serve them up in style? Let’s dive into some fun presentation ideas next!
Serving Suggestions for Ice Cream Sandwich Cake Pops
You’ve crafted these delightful ice cream sandwich cake pops—now it’s time to show them off! Whether you’re hosting a birthday bash or looking for a fun weeknight dessert, how you serve them can elevate the experience from simple to spectacular.
Party-Perfect Presentation
- Stick them into a decorated foam block
Cover a block of floral foam with festive wrapping paper and stick your pops in upright—like a cake pop bouquet! Great for kids’ parties and dessert tables. - Use mini cupcake liners
Place each pop in a colorful liner for a neat, mess-free grab-and-go option. It adds a pop of color and keeps fingers clean. - Arrange on a chilled platter
For outdoor events or summer gatherings, keep your serving tray chilled in the freezer before placing the pops on top. This helps them stay frozen longer.
Pair with Other Treats
- Build a frozen dessert bar
Serve alongside mini cones, popsicles, or frozen fruit skewers for a playful and refreshing dessert station. - Serve with dipping sauces
Offer melted chocolate, caramel drizzle, or fruit syrups on the side for a DIY dipping experience. - Add to a charcuterie-style dessert board
Combine cake pops with cookies, marshmallows, and berries for a creative platter that’s easy to share.
Seasonal Serving Ideas
- Holiday cheer: Add crushed candy canes or red-and-green sprinkles for Christmas fun.
- Summer splash: Serve with tropical fruits like pineapple and mango on skewers.
- Birthday glam: Use gold or rainbow sprinkles and edible glitter for extra sparkle.
No matter how you serve them, these fun party desserts are guaranteed to be the center of attention. Just remember to keep them chilled until you’re ready to enjoy—and be ready for everyone to ask for seconds!
Conclusion
Making Ice Cream Sandwich Cake Pops is one of those delightful kitchen projects that brings joy from start to finish. They’re easy to prepare, wonderfully customizable, and perfect for sharing with friends and family at any occasion. Whether you’re new to no-bake desserts or a seasoned pro looking for a fun twist, this recipe offers a refreshing way to enjoy your favorite frozen treats.
Remember, the key to success is keeping everything chilled and working in manageable batches to avoid mess and frustration. With just a handful of simple ingredients and a bit of creativity, you can create a crowd-pleasing dessert that looks impressive and tastes even better.
So, next time you want a fuss-free, playful, and utterly delicious dessert, reach for this recipe. It’s an easy way to bring smiles—and maybe a few happy dance moves—to your kitchen. Ready to make these frozen cake pop snacks your new favorite treat? Let’s get started!

Ice Cream Sandwich Cake Pops Made Easy and Fun
Ingredients
Method
- Take the ice cream sandwiches out of the freezer and let them sit at room temperature for about 5 minutes—just enough to soften slightly.
- Place the softened sandwiches in a large mixing bowl.
- Use a spoon or your hands to mash and mix them into a soft, uniform mixture.
- Add in the cake or brownie crumbs, stirring until fully combined and moldable.
- The texture should be like cookie dough—firm enough to roll, but not too sticky.
- Scoop the mixture into even portions using a cookie scoop or tablespoon.
- Roll into balls about 1 to 1½ inches wide.
- Place them on a parchment-lined baking sheet.
- Insert a lollipop stick into the center of each ball.
- Freeze the pops for 1 hour, or until completely firm. This step is key to making sure they don’t fall apart during dipping.
- While the pops are freezing, melt your chocolate or candy melts in a heatproof bowl.
- Add a little heavy cream or coconut oil to help the chocolate stay smooth and glossy.
- Stir until silky and pourable—perfect for coating.
- 🫠 Use a double boiler or microwave in short bursts, stirring frequently to avoid burning.
- Remove the frozen pops from the freezer and begin dipping:
- Hold each pop by the stick and dip into the melted chocolate, gently twirling to coat evenly.
- Tap off the excess and quickly add sprinkles, nuts, or other toppings before the coating sets.
- Return pops to the parchment-lined sheet and place back in the freezer for 15–20 minutes to set.
Notes
- Calories: 180 kcal
- Total Fat: 9g
- Saturated Fat: 5g
- Cholesterol: 15mg
- Sodium: 70mg
- Total Carbohydrates: 22g
- Dietary Fiber: 1g
- Sugars: 15g
- Protein: 2g
Frequently Asked Questions About Ice Cream Sandwich Cake Pops
Making these fun and delicious ice cream sandwich cake pops can bring up a few common questions. Here are some answers to help you feel confident and ready to impress!
1. Can I make these cake pops ahead of time?
Absolutely! These pops are perfect for make-ahead prep. Once dipped and decorated, store them in an airtight container in the freezer. They’ll stay fresh for up to one week—ideal for parties or busy days.
2. What’s the best way to store ice cream sandwich cake pops?
Keep them frozen in a sealed container to prevent freezer burn and preserve their shape. When ready to serve, let them sit at room temperature for about 5 minutes to soften slightly before enjoying.
3. Can I use homemade ice cream sandwiches?
Definitely! If you love a homemade touch, making your own ice cream sandwiches adds a special flair. Just ensure they’re well-frozen before crumbling and assembling your cake pops.
4. How do I prevent the cake pops from falling off the sticks?
For a secure hold, dip the tip of each stick in melted chocolate before inserting it into the cake pop mixture. This “glue” helps the stick stay firmly in place once chilled.
5. Are there dairy-free or vegan alternatives?
Yes! Use dairy-free ice cream sandwiches and vegan chocolate or candy melts to accommodate dietary preferences without compromising on flavor or fun.
If you have more questions or want tips on customizing your pops, feel free to ask. Ready to create your own frozen treat masterpiece? Let’s get started!